Dry-aged steaks

I was reading, again, my various Cook’s Illustrated magazines looking for seasonal recipes to try. A magazine reader had written in about dry-aged steaks and wondered if this could be done at home. (Reference the March-April 2010 edition of the magazine). The editors replied about their efforts and I decided to give it a try.

  • 2 top sirloin steaks (about 6 ounces each?)

Wrap thoroughly with cheesecloth and place on a rack in the back of the refrigerator (where it is coldest) for four days. Pan sear and enjoy. Supposedly these are tender and intensely flavorful like the more expensive dry-aged steaks. Cook’s used 2 rib-eye and 2 strip steaks.

  • I put mine in the fridge on a Monday and we cooked them on a Saturday so that was a bit longer than the magazine.
  • I wrapped mine while they were still frozen.
  • They had a nice flavor but were not particularly moist or tender.
  • Hubby says the verdict is still out as these were some of the leftover pieces from a top sirloin butt that he had cut up earlier this year.
  • He would like to try this with rib-eyes.


Chocolate Mousse Cake a la King Arthur

King Arthur Flour (no I do not get paid for talking about them) has a monthly bake-along. February is a Chocolate Mousse Cake with Raspberries. Looked and sounded delicious and something fun to make on one of my two February holidays. Well, if you know me, I changed it up just a bit. I was not going to spend a fortune on fresh raspberries in the middle of winter. I like chocolate covered cherries and I had a can of cherries in my pantry. I could use those.

So the original bake-along recipe is right here: Chocolate Mousse Cake with Raspberries. I made the cake exactly. I happened to find four 8-inch cake pans, two of which were three inches deep so I baked the cake in two pans and cut these into the four layers. Hint for you: this is a thin batter just like they say. It may not be that wise to use pans that have removable bottoms. Just saying. I had a bit of leakage, very little but I had to bake the cakes on a cookie sheet. I also baked the cakes at 350 degrees F. They came out nicely. They did not have domes, so I am not sure if they fell a bit. The finished product is so rich it was impossible to tell.

  • 1 3/4 cups Unbleached All-Purpose Flour
  • 2 teaspoons baking soda
  • 1 teaspoon baking powder
  • 1 teaspoon salt
  • 2 cups granulated sugar
  • 1 cup unsweetened cocoa powder
  • 1/2 cup vegetable oil
  • 1 cup buttermilk
  • 1 cup boiling water
  • 2 teaspoons vanilla
  • 3 large eggs

Whisk dry ingredient together. Mix wet ingredients together but not eggs. Put wet ingredients into dry ingredients, combine thoroughly. Beat in eggs one at a time. Put into the greased pans and bake. The two 8-inch x 3-inch pans took 55 minutes. Cool completely and slice each layer in two.

The mousse filling was more difficult. It did not come out smoothly and was difficult to spread between the layers of the cake.

  • 2 tablespoons soft butter
  • 8-ounce package cream cheese, at room temperature
  • 1 cup confectioners’ sugar, divided
  • 1/2 teaspoon vanilla
  • 1/8 teaspoon salt
  • 2/3 cup semisweet chocolate chips, melted
  • 1 cup heavy cream

Beat the butter, cream cheese, 3/4 cup sugar, vanilla and salt until creamy. Melt the chocolate and stir that in. Whip the cream with the remaining sugar until stiff. Fold this into the cream cheese mixture. This ended up swirled and not a uniform color. Perhaps that was okay.

I used a can of cherries, drained, and a jar of cherry fruit spread instead of raspberries. I mixed this and spread it on top of the mousse layer. I forgot to put cherries on the middle layer. I don’t think anyone noticed this omission.

Once this is done chill or freeze the cake for 30 minutes so it will be easier to frost.

At this point I am thinking about the frosting. This cake already looks extraordinarily rich. The KAF frosting calls for another cup of butter and 4 cups powdered sugar. That just is too much. I then remember I had made a chocolate sauce to serve with the disastrous orange cake for Christmas. Since that cake was inedible I had frozen the sauce for use at another time. This seemed to be that “another time.”

  • 1/2 cup light brown sugar
  • 1/3 cup cocoa powder
  • 3/4 cup milk
  • 2 ounces bittersweet chocolate, chopped
  • 1 tablespoon orange extract or liqueur (it was actually the poaching syrup from the disastrous orange cake A Christmas Sponge: an Orange Upside Down Cake)

Whisk sugar and cocoa in a small sauce pan. Gradually whisk in the milk until a smooth paste forms. Reduce heat and simmer whisking constantly for 4 minutes. Remove from heat and stir in chocolate and orange extract. (the orange taste does not come through at all.)

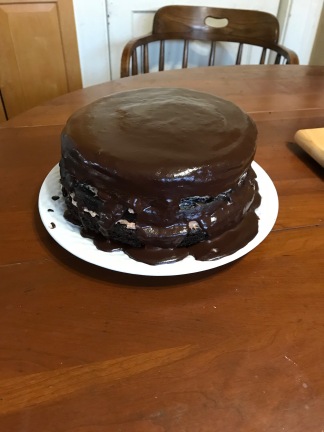
So I thawed the chocolate sauce and poured it out on the cake. This gave it a nice glazed cover. Now this glaze looks like a ganache but does not firm up like one.

This is not nearly as good looking as the picture on the King Arthur website. But served with a bit of whipped cream it is chocolate decadence! A little dab will do ya!

Lessons learned: If you want a rich chocolate cake that makes thick layers use this cake recipe. I would make a different filling or just use the fruit and preserves in between layers with some whipped cream. Cover with your own ganache or just sprinkle with powdered sugar. That way you could have a fancy cake with less fuss. But we are enjoying our indulgence a little at a time. Store cake in refrigerator.

Cinnamon Bread

Quite a while ago Hubby asked if I could make Cinnamon Bread, or at least I think he did, but I did not make any. King Arthur Flour’s website is a gold mine of baking recipes for us home cooks. I saw this and thought I would make this. I used to bake breads all winter long but not this winter. Not sure why? Here is the link to the original recipe from KAF: Cinnamon Bread. I made a few adjustments.

  • 2 1/2 teaspoons instant yeast
  • 2 cups all-purpose flour
  • 1 cup whole wheat flour
  • 1 1/4 teaspoons salt
  • 3 tablespoons sugar
  • 1/4 cup instant dry milk
  • 3 tablespoons potato flour
  • 7/8 to 1 1/8 cups warm tap water
  • 6 tablespoons butter, at room temperature

Whisk dry ingredients together in large bowl of stand mixer. Put butter and water together in Pyrex measuring cup and microwave for 30 seconds. Add the liquid to the dry, stir to combine, and then knead for 7 minutes at Speed 2. I first used the lesser amount of water but the recipe said the dough should barely clean the sides of the bowl. With the lesser amount the dough cleaned the sides right away so I added the extra 1/4 cup. This made a more sticky dough that seemed to match the description from the recipe.

Place the dough in a greased bowl. To do this I scrape the dough to one side of the mixing bowl, spray with cooking spray, then scrape the dough to the sprayed side, and spray the rest of the bowl and the top of the dough. Cover and let rise until doubled. This took about an hour and 15 minutes.

Transfer dough to a lightly greased work surface. I did this. I had never not used a floured work surface for bread making. And this worked out well. Pat the dough into a 6 inch by 20 inch rectangle. Lucky for me my butcher block work surface has a pattern of 2 inch squares all over the top. So measuring the rectangle was to perfection!

Make the filling: 1/4 cup sugar, 1 1/2 teaspoons ground cinnamon, 2 teaspoons flour. Beat one egg with 1 tablespoon of water and brush this on the dough before sprinkling on the cinnamon mixture. This is to keep the swirl from making gaps in the bread while baking. Roll into a log starting with the short end. Pinch the ends and the long seam to seal. Place in your lightly greased or sprayed loaf pan. Tent loosely with lightly greased plastic wrap and let rise until 1 inch over the rim of the pan.

The size of your loaf pan will matter. I spent my morning measuring the three I have and they are all 9″ x 5″ pans. This loaf, per KAF, will rise more nicely in an 8 1/2″ x 4 1/2″ pan. In the 9″ x 5″ pan it will rise to the rim. Mine rose very slightly above the rim in 1 hour and 20 minutes time.

Bake in preheated 350 degrees F oven. “Allow the bread to completely cool before slicing.” Yeah right!

IMG_0878
Perfect swirls!

This was yummy and makes a nice toast with my coffee. I just have to be sure I don’t eat it all in one day; that would wreak havoc with my goal of losing a few pounds!

I like recipes from which I learn something. From this one I learned that one could substitute potato flour for instant potato flakes, using an egg wash helps the filling stay in place, and one can use a lightly oiled work surface for shaping bread dough.

Chicken Cooked in Wine with Caramelized Onions

This is an adaptation of a recipe from a “diet book” with the theme of eating the same primary flavor throughout the day. Supposedly this will keep you satisfied and encourage less eating and encourages weight loss. I only tried this theme day once years ago so I have no idea if it would work or not. But this recipe I kept because it sounded good anyway.

We have been trying not to overspend on groceries so my cupboard is sort of bare. Not as bare as Mother Hubbard’s though. Remember that nursery rhyme? I have lots of pantry staples of beans, rice, more beans, pasta, canned tomatoes, more beans. I only had two onions remaining and that is all that this recipe required. And in the freezer I have one of those 5 pound bags of individually frozen chicken breasts. These are great. I pulled two out and put in the fridge to thaw during the day while I went to work.

  • 2 nice sized chicken breasts
  • 2 teaspoons vegetable oil
  • 1 tablespoon butter
  • 2 medium yellow onions, sliced
  • 1 cup red wine
  • 1 cup broth (I used vegetable broth; chicken broth would be preferred)
  • scant 1/2 cup dried cranberries (Craisins)
  • 2 tablespoons rinsed and drained capers
  • 2 teaspoons crushed dried rosemary (I had dried this herb from my summer herb pot and used a mortar and pestle to crush the leaves.)

Heat oven to 375 degrees. Place chicken breasts into a pan. I used a 10 x 7 inch pan which fit the two breasts just fine. Place in oven.

Meanwhile heat the oil and butter in a skillet and add the onions and cook for 5 minutes. They will be soft but not yet caramelized. Add the remaining ingredients and bring to a boil. Simmer for 5-7 minutes. Pour this over the chicken in the pan in the oven. Bake for one hour. The sauce thickens and becomes a glaze.

IMG_0877


Sorry about the picture. It doesn’t really show case the chicken. We were half way through our meal when it occurred to me to take a picture. I served this with peas and carrots and a quinoa/rice mix.


Thoughts:

  • if using two chicken breasts, use half the amount of liquids.
  • one could use up to 6 chicken breasts for the amount of sauce the recipe makes. Just use a bigger baking dish.
  • the chicken was very moist and flavorful as was the sauce.