Musings from my Kitchen Table

For the past 8 or so weeks I have started my day sitting at my kitchen table contemplating the day at home, out of work due to my broken ankle. If hubby had coffee before leaving for work there is a thermos of coffee waiting for me. If not, that is the first thing I’ll make. I have a journal that I write down what I would like to accomplish on that day or that week. My “to do” lists rarely have been checked off completely. From my kitchen table I can see the stove, the pile of dishes in the sink, the cats eating their food, and my cabinets full of cookbooks.

In the weeks before Christmas the list was full of sewing projects, cookies to bake, and gifts needed. I wheeled around the house in my sewing desk chair preparing for the holiday. Then the holidays came and family was around and it was great fun. The ankle pain had died down mostly by then but for occasional twinges and achiness. After the Christmas holiday my son was home and we talked some, he played piano a lot, and I trusted him to drive my car. It is a standard shift and he learned and mostly drives automatic. We cooked a little bit together, watched Jeopardy and football, and he cooked some meals for us.

So after the New Year I expected to be healed and well on my way back to work. Did not happen! Another 4 weeks for healing the bone was needed. So here I am, sitting at my kitchen table in the mornings planning out my day. There is no holiday to prepare for. It is only bleak winter.

The son left for vacation. He decided to see Vietnam. I went to High School and college in the 1970s. My brother had a low draft number the year they stopped the draft. Saigon fell in 1975. There was a flooding of refugees. Do you know the oddness of feelings when there is the thought “my son left for Vietnam this morning”? (Mothers of my parents’ generation dealt with that for the many years of the war. I am ever grateful that my family was saved from the ravages of that war. Many were not spared.)

Bleak winter calls for soup. This is a barley soup from the back of the barley package. I use my regular substitutes: potatoes for parsnips, spinach for kale, northern white beans for the cannellini, Italian seasoning for the basil. With soup, the exact ingredients are not essential for successful outcome. Throw whatever you have around the house in a pot of broth!

Sitting in my kitchen I like to plan supper. I don’t want to wait until the end of the day to decide. Sometimes I do, though very seldom. I brought my computer in here so I could take care of household business. But I also peruse all sorts of wonderful recipes from you fellow bloggers as well as the King Arthur Flour website and blogs. I have gotten used to baking something or trying a recipe each day.

The other day I was contemplating brownies. Today I am contemplating chocolate cake. I was even thinking I could make a cake and send my sister a picture of it for her birthday at the end of this week. “Give” her a birthday cake!? Hubby does not have a sweet tooth like mine. I would eat 80% of the cake when and if I make one. What to do? I revisit the desserts for two website: www.dessertfortwo.com . Here I can find small batches of chocolate desserts. Brownies or cakes, which will it be?

And I have been thinking about frozen raspberries as well. And here is where other bloggers become my inspiration. I rarely make one of the recipes exactly but I will give credit to the inspirers! http://bitesize-bakes.com/2016/01/26/raspberry-buttercream-layer-cake/ and http://www.dessertfortwo.com/2011/09/one-bowl-chocolate-cake/ and http://sugarbcupcakes.com/2016/01/21/chocolate-raspberry-ganache-cake/

MusingsChocCake 008I get out the closest thing to a six inch cake pan that I can find. This is a 7-inch cast iron skillet to make the one-bowl-chocolate-cake:

  • 4 Tablespoons unsalted butter
  • 2 ounces semi-sweet chocolate chips (I am using Hershey’s Special Dark since the only other chips I have are bittersweet chocolate)
  • ½ cup seedless raspberry jam
  • ¼ cup plus 1 Tablespoon sugar
  • 1 large egg
  • ¼ cup plus 2 Tablespoons flour
  • ½ teaspoon baking powder
  • 1/8 teaspoon salt

Grease and flour the pan. Melt butter; stir in chocolate until melted; add the jam and sugar and stir well; add the egg and stir until well blended. Sprinkle on the dry ingredients and stir just until combined. Bake 43 to 45 minutes at 350 F. My cake took only 40 minutes. The directions say to let cool completely before trying to slice. I turn it out on a plate. Tasting the crumbs from the bottom of the pan finds that there is definitely a raspberry taste to this chocolate cake.

MusingsChocCake 010

Meanwhile plan the frosting! With the Raspberries! Should it be pink or chocolate? When getting the raspberries from my freezer I find that I have a container of chocolate frosting leftover from the birthday cake made in early December. (I hate throwing food of any kind away.) So I take some raspberries for decoration and put the rest with this frosting, thawed of course. I whip that up to blend and then chill it a bit for spreading consistency. Now to wait for the cake to cool completely. Otherwise the frosting will melt and become more of a glaze. That’s not a bad idea, but, no, I’ll wait.

MusingsChocCake 014

Looks very rich and yummy! I could whip up some cream to serve with it. This small cake should make dessert for two for two nights.

(While finishing this up the KAF shopping magazine came in the mail, with a chocolate sheet cake recipe in it! Another cake next week?)

Sourdough Waffles

Winter has arrived with the first major snowstorm. Hubby estimates there is about 12 inches of snow in the yard and three foot drifts where the plows cleared the roads. That was more snow than we expected. There are areas of our state that got more than that as well as less: nothing to a dusting to 4 inches to 16 inches. But living in the Northeast means snow for winter. Although we had become spoiled by the mild temperatures thus far. I’ve done as much as I can about the weather, how about you?

Knowing that the snow would continue through the night I planned that we would have a Sunday morning in while hubby cleared the walks and driveway and cars. Knowing that I have a somewhat neglected sourdough starter in the fridge that needed feeding I planned to make waffles for breakfast. Knowing that the recipe calls for buttermilk I created “sour milk” with the age old technique used by my Mom, add Tablespoon of lemon juice or vinegar to measuring cup for each one cup of buttermilk needed. Knowing the sourdough batters often need time to “ripen” I got out my cookbook and prepared the “sponge” the night before.

first snow storm 010
this has some nice sourdough recipes

I am using the recipe on page 542 of the book. The batter is for pancakes but can be used to make “the lightest, tastiest waffles you’ll ever eat.” The sponge is made by combining the flour, the sugar, and tfirst snow storm 008he buttermilk and then adding the starter. Blend well and let rest for two hours or overnight.

  • 1 cup all-purpose flour
  • 1 cup whole wheat flour
  • 2 Tablespoons sugar
  • 2 cups buttermilk, slightly warmed
  • 1 cup sourdough starter

In the morning the rest of the ingredients are added.

  • 2 eggs
  • 1/4 cup butter, melted
  • 3/4 teaspoon salt
  • 1 teaspoon baking soda

These are beaten separately until light and then blended into the sponge. “(watch the batter begin to bubble and foam)”

This makes a lot of batter! Now make the waffles using the directions for your waffle iron. I have a nice waffle maker given to me by my wonderful daughter and son-in-law.

first snow storm 014
Breakfast is served!

These turned out crisp on the outside and tender on the inside. Definitely a keeper recipe!

A good day for baking: what to make?

I slept in a bit in the morning. This allowed little cat to continue to curl up on the covers with me. It is a cold day but not quite as cold and windy as the day before. While sitting at my kitchen table having my morning coffee it occurs to me that this would be a good day to warm up the kitchen by baking something. But what? I do not want to bake something too sweet or something that there is a lot of. Chocolate always comes to mind but that may be too sweet.

raisin bread 003While perusing two of my cookbooks that were published in the UK, I come across a sultana and walnut bread recipe with photo. That looks good. It is yeast bread. Do I want to take that much trouble this morning? I have all the necessary ingredients. However, if I want to make raisin bread, this would make a nice toast for breakfast with my coffee; why not use the tried and true Soulard Market cookbook? I get this book out and I have all those necessary ingredients as well, including the chopped pecans. Decisions, decisions!

The perusing of the UK cookbooks was to find recipes for quinoa, bulgur, and barley. I bought packages of each of these interesting grains at my local Aldi store, and wanted to make something other than tabbouleh since I do not have fresh cucumber or cherry tomatoes. I find an interesting chick pea recipe and one for sweet potatoes. I will make the sweet potato recipe with ginger for supper. So the perusal was still productive in that since.raisin bread 002

I decide to make the Soulard Raisin Bread. My kitchen is cold and a yeast bread will take twice as long to rise and I am getting a late start to the day as it is. Not that I have anything to do except what I choose to do these days, at least for a few more weeks.

Quick-Stirred Raisin Bread:

  • 2 cups whole wheat flour ( in my experience baking with only whole wheat flour makes a product heavier than I like; I use 1 cup all-purpose and 1 cup whole wheat)
  • 1 teaspoon each of baking powder, baking soda, and salt
  • 1 egg
  • 1 ½ cups buttermilk
  • ¼ cup honey or maple syrup (I use honey; maple syrup is too dear and I want it for my waffles and pancakes when I get around to making some)
  • 1 cup raisins (see brilliant idea later in the narrative)
  • ½ cup chopped pecans

Like quick breads and muffins the dry ingredients are combined and then the wet put in all at once and stirred only until blended. I use a whisk to combine the dry ingredients.raisin bread 004 This is much handier than using a sifter. I had read a handy hint somewhere that spraying the measuring cup with cooking spray before measuring honey helps to ease all of the honey out of the cup and into your recipe. I did this and it really worked!

After the dry and wet ingredients are mixed it is time to add the “extras”. So I am pouring the golden raisins into the measuring cup when I have a brilliant idea! I have in my pantry a package of dried Berries and Cherries!raisin bread 005

These will go in this bread nicely. So I use ½ cup of the raisins and fill the rest of the cup with Berries and Cherries. These get stirred into the batter and put into the prepared pan (greased or sprayed with cooking spray. Now it is ready to go into the oven. Bake for 55-60 minutes.

The recipe directions then say to cool in the pan for 5 minutes before turning out onto a wire rack to finish cooling. Now comes the hard part: waiting for the bread to cool so that it slices nicely.

I spread this piece with cream cheese and enjoy. If hubby and I don’t eat all this evening for a dessert, I will toast a slice or two for breakfast in the morning. Yum!

Potato Soup

In trying to think of what to write about to share with you all Hubby suggested comfort foods. I cannot truly recall what these were in my childhood but in hindsight I think about Chicken Dumplings and Potato Soup. Hubby thinks about grilled cheese sandwiches cut into “soldiers” and served with tomato soup. Grilled cheese and tomato soup is a combination my sister served her children. I did not like tomato soup as a child so I never made it or served it to my children. Mind you, this would be the condensed version diluted with water; I don’t think my Mom used milk to “heat and serve”. Nowadays there are the non-condensed soups with added tasty ingredients and I find that I enjoy tomato soup with spinach every once and awhile. I read somewhere a long time ago that foods served with a spoon are comfort foods, perhaps adding cream or milk as well. Sounds reminiscent of children’s foods.

I have a bunch of potatoes recently bought and in the bottom of my pantry. I have a hankering for potato soup. My Mom’s potato soup was made with milk, potatoes, onions, and butter. I remember the butter floating on top. She would not have necessarily used evaporated milk or cream so it was probably plain milk and water. It was a thin soup with the potatoes being the primary solids.

potato soup 002

I have a potato soup in a cookbook that I bought as an adult. It is one of those Better Homes and Gardens collections. The pictures in this book are very appealing. Here is the one for potato soup. It looks wonderful. Makes me hungry just looking at it! I think I may have made this once before but it doesn’t seem to me that my children ate it so I am not sure. Hubby doesn’t particularly like soups unless they are very chunky and stew-like. That may be a difficult call for a potato soup. But since I am home days with this tiresome broken ankle, I could make soup for my lunches. That is the plan!

This particular soup calls for chicken or vegetable broth. Well, I believe I have some frozen homemade turkey broth in the basement freezer. But I do not go down the basement steps on crutches. No, no, no, no! So I look into my newer The Settlement Cook Book (newly revised and enlarged, 1965, 1976, original publication 1901). Other than caraway seed which I entirely doubt that my mother used here is a recipe that sounds like hers: potatoes, butter, salt and pepper, onion, and milk.potato soup 003

Now I never leave well enough alone so I want to add colorful red peppers, maybe some orange and yellow as well, and bacon or ham. I might even add the tops of green onions.

potato soup 004So I gather my ingredients: I am using canned milk for a creamier base and could add regular milk to make two cups. Or I could just add the can, undiluted, to the liquid after it cooks. This will depend on how much liquid is in the pot when the time comes. The recipe calls for 3 cups diced potatoes. The other calls for 3 medium potatoes (2 ¼ cups) so I will use 4-5 potatoes. I like onion so I will use two small onions instead of ½ of a small onion. I have also learned that to sauté the aromatics prior to putting them in the soup liquid make a more flavorful soup. Therefore I cut the onion, peppers, ham, and cook those gently in the 2 Tablespoons of butter. I cook these for about 5-7 minutes until there is quite an onion aroma in my kitchen!

Meanwhile peel and dice the potatoes. I peel 5 potatoes which makes 4 ½ cups. I suppose I could have done with 4 potatoes! Oh well! While I am dicing these it occurs to me that my Mom sliced her potatoes so I do that, sort of. These are about 1/8-1/4 inch thick. I wonder why I peel these. Most of my potato dishes have the peels intact. In fact, a second look at the Better Homes and Gardens photo shows unpeeled potatoes. Too late now. Add these potatoes to the pot with the aromatics and add water to cover.

This amount of ingredients took almost 5 cups of water. Now this is to be cooked until the potatoes are tender, 10-20 minutes. The milk will be added then and heated through but not brought to a boil.

I found a package of not too stale saltines which is what my Mom would have served this with or with white bread toast. I prefer the saltines.

potato soup 009
A very tasty lunch!

The ingredients for this soup turned out to be:

  • 4 ½ cups diced/sliced potatoes
  • ¼ cup chopped green onion tops
  • 1 each small red, orange, and yellow peppers, sliced
  • 4 ounces of boneless ham steak, diced
  • 2 small onions, diced
  • 2 Tablespoons butter
  • 5 cups water
  • 1 12-ounce can evaporated milk
  • Salt and pepper to taste

One could add a can of clams, drained, and turn this into New England Clam Chowder. Or add fresh or canned or frozen corn and turn it into Corn Chowder. One could put a bunch of vegetables in there and have a creamy vegetable soup. I bet broccoli and carrots would be nice and one could stir in some grated cheese. This could quickly be prepared with pre-prepped ingredients found in the freezer and produce sections of general grocery stores. All kinds of possibilities when talking about soup!

And soup is so nice to have on cold, bleak winter days;my thermometer says it is 21 degrees (F) outside today!

Kitchen Gadgets

I like kitchen gadgets. Most of them are not multi-purpose so I try not to get things that are so specific. It is like having that one exotic ingredient in the pantry that gets used once and then is forgotten about. That reminds me, I should go through my spice cabinet and inventory what I have so I can use the ones I have forgotten about.

gadgets2 003My newest gadget is a bread keeper. I have a wonderful old-fashioned bread box with a cutting board in the door similar to the one my mother had and the green one she gave me when I moved away from home. The green one did not have the cutting board in it. My aluminum bread box is supposed to work like this plastic one. There are vents in the sides so crusts stay crisp. The problem is in keeping the cut side from drying out.  I saw this bread keeper in a magazine and have seen it in catalogs over the years. I wondered if it would be good for keeping home made bread fresh.

But what is the definition of “fresh”? no mold? soft and fluffy? not hard as a rock?


Here I have several bread types in the gadget: home made bread (6 days old), biscuits (5 days old; from Popeye’s; I still have not mastered the fabulous biscuit!), and home made rolls (3 days old). I have examined them and there is no mold. They are not rock hard, but do not appear soft and fluffy. The exterior is beginning to feel stale. This means that they are edible and will need toasting to perk them up. So…what to do with them?

I planned on making chili for supper and cornbread, but why make more bread when there is this perfectly useful bread here? My son suggested that we put these on top of the chili to steam them. I used to make a Hungry Boy Casserole for him when he was growing up. This consisted of browned ground beef, onions, peppers, and a can of tomatoes baked with biscuits on top. Since these biscuits and rolls are already baked they may get a bit soggy but they will soften. Perhaps they will be like dumplings in the chili. Let’s see what happens!

Do you like kitchen gadgets? I have a number or them. I like the old-fashioned types: ricers, butter cutters, juicers. I even have a shredder. This is like a mechanical food processor. I picked this up for $3 at a tag sale. I used it a couple of times but it is a bit awkward.

I think there are basic kitchen gadgets/appliances one needs. I went years without a food processor or a blender. I absolutely love my KitchenAid stand mixer, especially the bread hook! The meat grinder attachment came with my hubby and we have used that to make breakfast sausage. Before the stand mixer I had a portable mixer, hand held. We have an immersion blender which is nice for making whipped cream and blending protein shakes. You can also make your own tomato juice by sticking it in a can of tomatoes! My Mom had one of those “old-fashioned” hand cranked mixers. It could blend eggs but not dough of any kind. I could ramble on and on about kitchen gadgets but I’ll stop now.

Go forth and cook!


Whole Wheat Buttermilk Bread

I found this interesting bread recipe while browsing through my Mom’s recipe notebooks. I had a carton of buttermilk in the fridge that needed to be used and I had exactly three cups of whole wheat flour, the white whole wheat variety from King Arthur Flour.


I gather up my ingredients and get to work. Reading through the recipe finds that there are three rising times for this bread and that it makes three loaves.

  • 2 packages active dry yeast (I use instant yeast at 1 3/4 teaspoons per active yeast packet for a total of 3 1/2 teaspoons)
  • 1/2 cup warm water (right from the tap)
  • 2 cups buttermilk
  • 1/2 cup butter (one stick, unsalted)
  • 4 tablespoons sugar or 1/2 cup honey (I use the honey)
  • 1/4 teaspoon baking soda
  • 1/2 to 1 teaspoon salt (I use 1/2 teaspoon)
  • 3 eggs
  • 3 cups whole wheat flour or cracked wheat flour, or combination (I use KAF White Whole Wheat Flour)
  • all-purpose flour to make a soft workable dough, about 5 cups
  • melted butter (optional, as I forgot to brush the tops with this as the loaves came out of the oven!)

Dissolve the yeast in the warm water. I do this even though instant yeast does not need to be activated. Pour the buttermilk in a saucepot, add the butter and heat until butter melts. Don’t mind if this curdles, it will not affect the final product.


wholewheatbuttermilk bread 007Meanwhile in large bowl mix the honey, baking soda, salt and eggs. The yeast mixture and the buttermilk mixture are to be added to this and stirred well. I find that this mixture gets quite hot and I need to let it cool down before proceeding.


Slowly add the whole wheat flour. The recipe clipping says to mix with a fork but I always use my Kitchenaid with the bread hook. After the wheatflour is added, add enough all-purpose flour to until you must use your hands to mix it in to make it soft and satiny. Here again I guesstimate this because I add  5 cups of the white flour and it is shiny and sticky. I knead this for 10 minutes with the bread hook and add one or two more handfuls of flour but it is still sticky. Supposedly one is supposed to have been able to turn this out on a floured board and knead it for about ten minutes. I did not want to keep adding flour and have a dry bread.

After this first kneading place in greased bowl, cover with plastic wrap and a towel, let rise for an hour to double in bulk. This rose nicely. Then punch dough down, knead lightly (it is still a bit sticky!) and then let rise again. This second rise time is not specified. I assume it is for another hour and that is what I allow. I had to flour the board quite a bit for the light kneading because the dough was sticky.

After second rising, turn dough onto lightly floured surface and knead lightly. Let rest for ten minutes. Meanwhile grease three loaf pans. I chose two loaf pans and one round pan to make rolls out of the third portion.Divide dough into three equal parts. Roll each part into a rectangle and roll up pinching edges and place in prepared pans. Let rise another 45 minutes.

Heat oven to 350 F and bake loaves for 35-40 minutes.  And then there is bread!

wholewheatbuttermilk bread 021

The clipping notes “the bread smells fantastic while baking” and “this whole wheat bread melts in your mouth.” We concur!


Missouri Mix

MoMix 001

Mom would send for a variety of information from the Agricultural Experiment Station at the University of Missouri. This later became the Extension Division. I think she was a farmer at heart. Missouri Mix is “an all-purpose baking mix that you can make up to be ready for easy baking. It can be used to bake many good foods.” The table of contents includes cookies, fried pies, muffins, pancakes and waffles, cakes, coffee cake, swirls, gingerbread,and pizza. Mom would make a batch of Missouri Mix and it would be in a large tub along side the other baking supplies in the kitchen cabinet. She made this up with vegetable shortening although it can be made with lard. The storage instruction for lard is that the mix must then be refrigerated.

Mom also has a “Basic Receipt For…”a mix developed at Purdue University. These mixes were substitutes for the expensive Bisquick in the grocery stores. Both cost out the ingredients. The cost of 5 pounds of flour at the time was 53 cents! Apparently in 1967 2 ½ pounds of Bisquick cost 55 cents and 4 ½  pounds of Missouri Mix cost about 70 cents.

MissouriMix 002
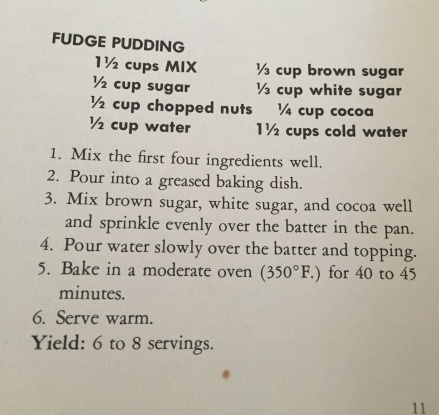
I have two booklets for Missouri Mix. The one with Mom’s notations is from April 1960. This is the one she gave me when I moved away from home. The newer one that I found in her recipe clippings notebook is from July 1976 but is the revision from 1971. My sister raised her family on Missouri Mix. I would make half a recipe since I did not make biscuits and muffins and the like often for my children when they were growing up. What I remember most and did make for my young family was the Fudge Pudding. This was a dessert that baked a cake on top and its own pudding underneath. Very yummy!

At one point in my family life I found “The New Missouri Mix” on line. I printed this out in 1997. This booklet has a “large batch”

  • 5 pound bag of flour or 20 cups
  • 3/4 cup baking powder
  • 2 Tablespoons salt
  • 2 1/2 cups nonfat dry milk powder
  • 3 3/4 cups shortening

and a “smaller batch” recipe.

  • 8 cups flour
  • 1/4 cup plus 1 Tablespoon baking powder
  • 2 teaspoons salt
  • 1 cup dry milk powder
  • 1 1/2 cups shortening

It still calls for shortening! There is a hint for using whole wheat flour and that would require storage in the refrigerator. This booklet does not have the “Fudge Pudding” recipe. But what to do about the shortening? You know, trans fats and all that!

But first let’s cost it out. I am using Walmart prices since I tend to shop at discount grocery stores. When I first calculated this formula I used the entire can of shortening and there was no cost savings at 2016 prices. Both the homemade and the store bought baking mix cost about $0.45 per cup. So why bother? But when I redid the calculation it came out with a cost savings. The home made mix cost about $0.36 per cup.

costof MOMIX 001


Several years ago while waiting for an appointment of some kind I was browsing through a magazine and happened upon a recipe for a homemade Bisquick using butter! This was intriguing because that would answer the trans fats and partially hydrogenated oils problem found in shortenings. I have made a half batch of this and here are the ingredients:

  • 3 Tablespoons sugar
  • 2 Tablespoons plus 2 teaspoons baking powder
  • 1 Tablespoon plus 1 teaspoon salt
  • 6 cups all purpose flour
  • 2 sticks frozen butter, unsalted, grated

This would make about a third of a recipe of Missouri Mix. The cost of butter would be more than the equivalent of shortening, but not that much more. Hmmm?

Lard has no trans fats. The mix could be stored in the refrigerator. But butter adds such nice flavor to baked goods. What to do?

I like home made. It is about making a home, making a meal, and living the legacy of my mother and grandmother. If I were to make this mix, I could make the Fudge Pudding at the drop of a hat! I could use half whole wheat flour and it would be “healthier”. I would also give in to the urge to make biscuits or muffins or other goodies more often.


fudgepuddingcake 001

So much for reducing carbs in my diet!

Georgian Stew: Chanakhi

Chanakhi 043

For New Year’s Day my son cooked a Georgian Stew: Chanakhi. I am not talking about the Southern state in the United States but of the country in the Caucasus. This had several inspirations and is an adaptation of the recipe in the book he gave me for Christmas which I read in just a few days. He then read it in a few days and decided this was something he would make for us.

But the book is not the only inspiration. My son served in the Peace Corps in Armenia (southern neighbor of Georgia) from 2010-2012. My sister and I visited him there in 2011. We spent the first few days of our visit in Tbilisi Georgia before traveling into Armenia and staying in Ijevan and then Yerevan.

So I have a bit of nostalgia around my visit to these countries in the region. I get a thrill when there is a reference to the Caucasus in books or shows or the news.

The book is The Art of Soviet Cooking: a memoir of food and longing by Anya Von Bremzen.Chanakhi 013


This is a fabulous readable history of the Soviet Union and the way that family experienced the times and food with a few recipes given in the back of the book.

Here in the U.S.A. I grew up in the era of “Better Dead than Red” and fears of Communism and Communists, a bit later than the McCarthy Era, but close enough. In this day and age the fear is of Terrorists and how hidden they can be. Anyway back to the Soviets…they were supposedly “the Evil Empire”. But when you meet everyday people and hear from them, they are just people living their lives the best they can, just like us.

Chanakhi 001While in Georgia that year I bought a cookbook of Georgian Cuisine. The translations of the recipes are not easy to follow in that the exact ingredients and amounts are not always given. Chanakhi is in this book and can be cooked in individual clay pots or “the boiler”. I am not sure what “the boiler” is but it sounds like a large Dutch oven or stock pot. “Sheep fat tail” is not something I can find in my local grocery store. Chanakhi is basically a lamb stew with onions, eggplant, tomatoes, and potatoes. Pork is more affordable than lamb so we use a Boston Butt.

The recipe we try to follow is from the Soviet book and not the Georgian. It is more “American kitchen friendly” than the book I bought in Georgia although it is a very complex recipe. This takes all afternoon to make and we fear having to eat late at night but this does not turn out to be the case. Recipe begun at 2:00 PM and we eat by 6:30 PM.

  • 3-3 ½ pounds Boston Butt Bone-in Roast (my son felt that a bone-in cut would make a tender stew; it should fall off the bone on its own at the end of cooking time)
  • 1 large red onion and 1 medium yellow onion, cut in wedges
  • 1 large eggplant (could not find Asian eggplants in the produce section)
  • 3 potatoes (russet, because that is what is in the pantry), cut in wedges
  • 1 28 ounce can of whole peeled plum tomatoes and its juice; we blend a few of the remaining tomatoes into juice for the second addition);about 1 ½ cups juice needed
  • Olive oil; a few tablespoons
  • ½ teaspoon salt; kosher salt, several grinds of pepper; several shakes of red pepper flakes
  • 1 teaspoon paprika
  • 12 cloves of garlic, minced
  • 2 Tablespoon red wine vinegar
  • 1 cup each of freshly chopped parsley, basil, and cilantro (we used home dried basil of about 2-3 Tablespoons, the other herbs were the fresh bunches from the produce section of the grocery store)
  • One crushed bay leaf (son’s addition, just because)

Now get ready for the preparation, assembly, and cooking! To start there is a toast with vodka chased by a pickle.

Preheat the oven to 325 F. This stew will be cooked on top of the stove and then in the oven. I have a 12 inch Cast Iron Dutch oven that will be the cooking vessel.This thing weighs about 20 pounds! But the son can handle it just fine.

Mince the garlic; chop the herbs; mix together in a bowl with salt, gratings of black pepper, paprika, and red pepper flakes. Cut the onions into large wedges or quarters.

Chanakhi 021Rub a handful of the herb mixture on the meat with a little of the olive oil. Chanakhi 028Pack the meat and the onion into the pot stirring them up to coat with the oil and herbs. Cook on high (on top of the stove) for 3-4 minutes, then cover and cook for 12 minutes. Turn the meat over and cook another 3-4 minutes.

Chanakhi 034Add 2 chopped tomatoes, 1 cup tomato juice, another handful of herbs and 1 Tablespoon of the red wine vinegar. Bring to a good simmer and then put the pot in the oven. Cook until the meat is tender. We checked it at 1 hour and 20 minutes and it was good.

Chanakhi 032Meanwhile char the eggplant over the stove burner for 2-3 minutes. Our big eggplant took about 5 minutes. My son contemplated skinning this but did not.

This was then cut into 4 sections, slit and stuffed with some of the herb mixture. Potatoes were cut into wedges and tossed with the herb mixture. Four of the remaining canned tomatoes were cut into fourths and the two remaining after those were churned into juice with the immersion blender.

The potatoes and the eggplant were added to the pot along with the remaining tomato juice and vinegar, and a handful of herbs after the initial hour and 20 minutes in the oven. Now this cooked in the oven for 30 minutes. Then add the quartered tomatoes and the remaining herb mixture. Cover this and bake for 20 minutes. Raise the oven temperature to 400, uncover the pot and bake for 15 minutes. Remove from the oven and let cool for 5-10 minutes before serving straight from the pot.

Chanakhi 045
enjoying the fruits of his labor


This took us all afternoon because we were not sure of the steps and had to double check the next step over and over. It took us just under 4 hours. For the future after the prepping of all the ingredients, this would take about 2 ½ to 3 hours. Also, for the future, we would use the small eggplant, peel and scrape out the seeds and then just slice it so that it can mix with the other vegetables and not stand out quite so much with all its seeds and skin. I think cooking it all in the Dutch oven on top of the stove would be my preference as well.

Chanakhi 046

I made a batch of popovers to go with this and the meal was a hit with all who partook.