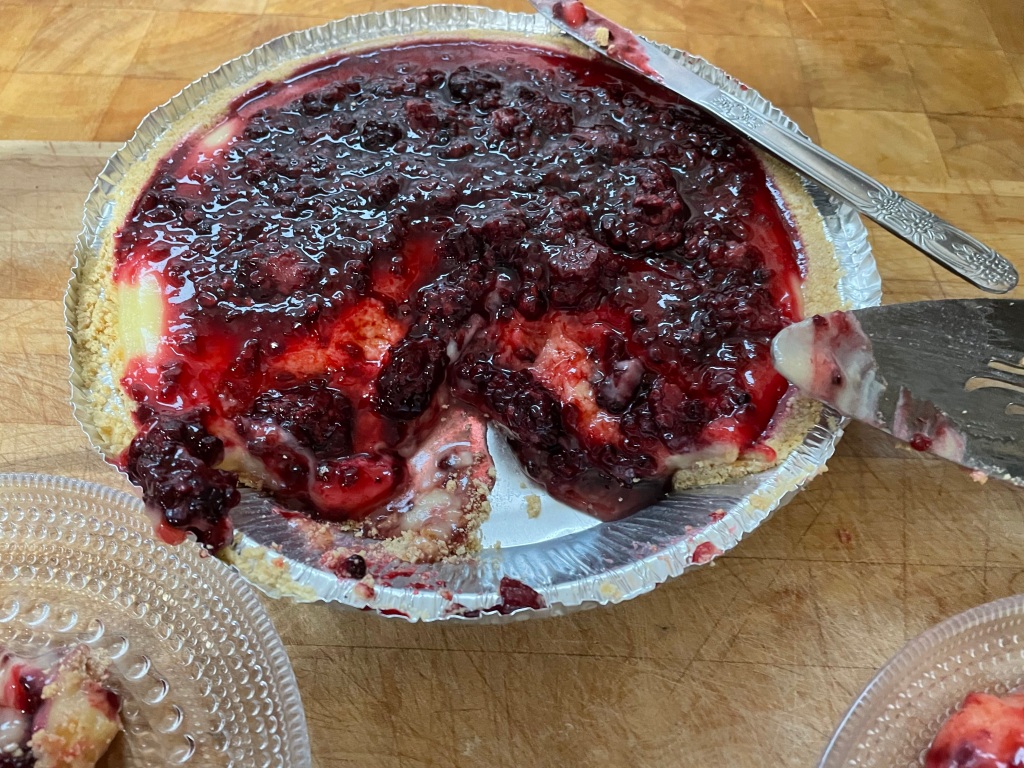
Basque Burnt Cheesecake

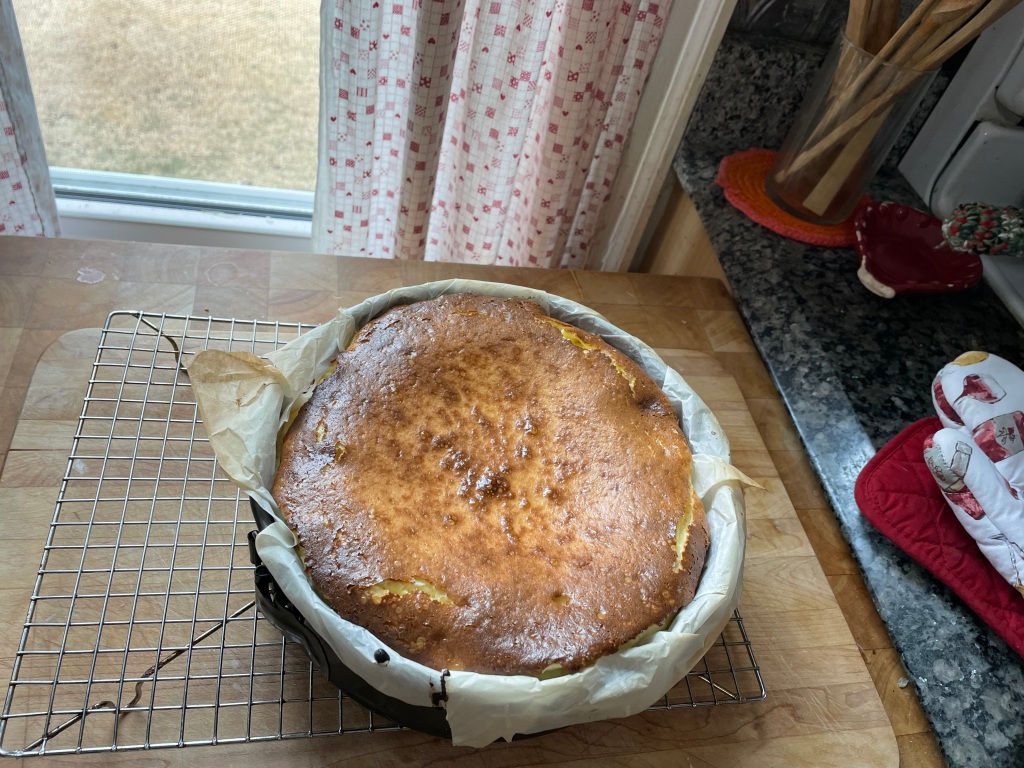
I had seen these on the internet and wanted to make one. Now that the cost of eggs has decreased slightly I figured I could afford to use 5-6 eggs on a dessert. There were so many recipes to choose from so I went with King Arthur Flour. It had the shortest list of ingredients. I did however add vanilla extract and baked it at a slightly lower temperature than the recipe called for. Here is the link: https://www.kingarthurbaking.com/recipes/basque-style-cheesecake-tarta-de-queso-recipe

  • 3 8-ounce packages cream cheese at room temp
  • 1 1/2 cups granulated sugar
  • 5 large eggs at room temp
  • 1/2 teaspoon salt
  • 3/4 cup heavy cream (I used 1/2 cup half-and-half and 1/4 cup evaporated milk.)
  • 1 teaspoon vanilla

Interesting pan preparation: crumple sheets of parchment paper and line the 9-inch springform pan in an overlapping fashion to fully cover the bottom of the pan and then fold up and over the sides over the edge of the pan. Preheat oven to 450 degrees. I used this temperature because I thought 500 was too hot and the other recipe I used for reference had the oven set to 400. Hubby suggested the in-between.

KAF wants the batter mixed until it is smooth and lump free. They suggest an 11-cup capacity food processor. Mine is only 9-cup. So with all the ingredients in the bowl I mixed it in my stand mixer and then used an immersion blender to smooth it out which is the alternative method suggested by KAF. This makes a lot of air in the batter which may account for how light it tasted. Not a bad thing!

Poor into the prepared pan and bake. I set the timer first for 25 minutes but the top was not “burnt” so added 10 more minutes and it was nicely browned and not too jiggly in the middle.

Remove from oven and let cool on a wire rack until room temperature before removing from pan. They don’t tell you how to remove the cake smoothly from the parchment paper so mine broke a bit.

I chose to make the Hot Cocoa Drizzle from https://www.halfbakedharvest.com/vanilla-burnt-basque-cheesecake/ just because, with the only substitute being evaporated milk for the heavy cream.

Advertisement

Brown Bag Banana Bars

Having two very ripe bananas languishing on my counter and having recently talked with my sister who was baking banana bread, I needed to do something with these. I planned for banana bread but found this recipe in my King Arthur Flour cookbook. It only calls for one egg and less than a cup of sugar so I thought these would not be too sweet. I added mini chocolate chips and walnuts instead of the poppy seeds and golden raisins included in the original recipe.

  • 1/2 cup butter or margarine; I used margarine! Hey, it was in my fridge’s freezer so…
  • 2/3 cup brown sugar
  • 1 egg
  • 1 teaspoon vanilla
  • 1 1/2 cups mashed ripe bananas; I used the two I had.
  • 1 1/4 cups all-purpose flour
  • 1/2 cup whole wheat flour; I used whole wheat pastry flour
  • 1/4 cup cornmeal
  • 2 teaspoons baking powder
  • 1/2 teaspoon salt
  • 1/4 cup mini chocolate chips
  • 1/4 cup chopped walnuts

Put this together the usual way: cream butter, sugar, and add the egg. Beat in banana and vanilla. Mix dry ingredients and add, mixing just until combined. Stir in chocolate chips and nuts. This is baked in a 10 x 14 inch greased pan at 350 degrees F for 20-25 minutes.

Thoughts: I was hoping for a banana brownie-like bar cookie but this is light and cake-like. It tastes a bit salty and I am wondering if I accidentally doubled the salt. Actually, thinking about it now, I think I used fine crystal sea salt and that may be saltier than ordinary kitchen salt. I wonder if baking it in a 9 x 13-inch pan would make a difference? Even though I was going to say “nothing to write home about” I do find myself nibbling on these when i want a “Little Something” as Pooh would say.

I have just learned that Hubby is getting me a baguette pan, so it’ll be baguettes at our house for awhile!

“Old-fashioned pound cake”

I must say that my baking has taken on a more thoughtful approach than before. This is due to the high cost of eggs and butter. We did buy eggs in bulk at the local Walmart which came to $4 per dozen instead of the $4.50 at the Aldi. Our other favorite discount grocery closed and we miss it. Butter is $4.50 per pound at the discount grocers.

But it is Hubby’s birthday and his favorite cake is pound cake with a light vanilla glaze. But this is not really an old-fashioned pound cake because it is not using a pound of eggs, butter, and flour. This recipe is from the Kitchen-Aid Cookbook (1992) which I bought at a discount store (now defunct) and not the booklet that came with the mixer because I cannot locate that one at the moment.

I followed the instructions which used higher speeds than I usually use but changed out the lemon zest and juice with a teaspoon of vanilla extract.

  • 2 1/4 cups all-purpose flour
  • 1 teaspoon baking powder
  • 1 teaspoon salt
  • 1 1/4 cups sugar
  • 2/3 cup butter, softened
  • 1/2 cup milk, I used non-dairy almond milk.
  • 1 teaspoon vanilla extract
  • 3 eggs

Place the dry ingredients into the bowl of the stand mixer. Make a well in the center and add the butter and milk. Using the flat beater “stir” for 30 seconds; stop and scrape bowl and beat at Speed 4 for 1 minute. Add eggs and vanilla and beat at Speed 2 for 30 seconds. Stop and scrape bowl. Turn to Speed 6 and beat for 1 minute.

Pour batter into a greased and floured, or parchment lined, 9 inch x 5 inch loaf pan. Bake at 325 degrees F for 1 hour and 10 minutes. I then added 10 more minutes to the time. I think at 350 degrees the time in the recipe would have worked. Cool in pan for 10 minutes before turning out onto a wire rack to cool. If you use parchment paper like I did, you do not have to wait the 10 minutes.

To make the glaze I whisked together 1/2 cup powdered sugar with 1 1/2 tablespoons of water and a dash of vanilla extract. Hubby pronounced this “the best ever!”

Thoughts: As I was preparing to bake this and then when cleaning up my kitchen, it occurred to me that I have gluten all-over my kitchen. No wonder my daughter cleans everything twice when she is here and we are cooking together. She is very sensitive to gluten. I was going to get her a KitchenAid stand mixer for her birthday this year as she is experimenting with baking gluten free breads, cookies, and muffins and apparently gluten-free baking requires long mixing times.

But as it happens… I took her to France instead!

Not Paris Brest: cream puffs instead!

I had grand plans to make a Paris Brest for New Year’s Eve. I even looked up how to pronounce it properly along with its history. I thought I would use my French Feasts cookbook as it is “traditional” French home cooking. So this is a decorative ring of choux pastry filled with praline pastry cream.

First to make the pastry cream, or “crème pat” as I hear it said on the GBBO. I make the full recipe from the above mentioned cookbook with a few substitutes. I flavored mine with vanilla.

  • 4 cups milk (used 12 ounce can of evaporated milk with 12 ounces of water, topped off with the oatmeal milk from the fridge)
  • 2 eggs and 4 egg yolks ( I used the 6 egg yolks left over from making meringue for a Baked Alaska dessert for Christmas Eve)
  • 1 cup sugar
  • 2/3 cup all-purpose flour
  • 1/3 cup butter
  • 1 teaspoon vanilla extract

Whisk eggs and sugar. Add flour and mix well. Bring the milk and butter to a boil and then add the egg mixture. Simmer gently over low heat for 10 minutes. Dust with sugar and chill. Be sure to whisk frequently and temper the egg mixture with some of the liquid while cooking before adding it all so to avoid scrambled eggs. This makes a lot of crème pat. I apparently have made this before, or Son has, as there are notations for half of the ingredients written beside the recipe in the book.

I then proceeded to make the choux pastry from this same book. I failed to compare it to other choux recipes from other cookbooks. This called for a full cup of butter and 4 eggs. It cost me 5 eggs as one fell on to the floor. No other recipe calls for this much butter, not Jacques nor Julia. Perhaps it is a typo.

The pastry was tasty but very thick. It was more of a cookie than a pastry. It did not turn out well. It broke into chunks when I attempted to slice it to fill with the pastry cream. I have half this dough in the fridge and plan to roll it out into shortbread cookies as that is the consistency of the dough.

So the next day I went to my faithful Betty Crocker Cookbook and made cream puff pastry dough which I have successfully made before.

  • 1/2 cup water
  • 1/4 cup butter
  • 1/2 cup all-purpose flour
  • 2 eggs

Heat water and butter to boiling. Stir in flour and stir vigorously over low heat until it forms a ball. Remove from heat and beat in eggs all at once. Continue beating until smooth. Drop dough on ungreased cookie sheet in 1/4 cupful. Makes six. Bake at 350 degrees F for 35-40 minutes. Let cool. Cut off tops. Fill with pastry cream. Replace tops. Glaze or frost as desired.

I melted dark chocolate chips mixed with some chopped almonds and teaspoon of oil for the chocolate icing. Yummy!

Now what to do with all that Patisserie Crème I have left in my fridge?

More Cookies

Butter cookies to be exact. This is from BakeWise by Shirley Corriher (2008). I thought I would try new cookies this year and these were described as “melt-in-your-mouth”. That sounded tasty.

  • 1 cup butter
  • 1 cup sugar
  • 1/2 teaspoon salt
  • 1/2 teaspoon almond extract
  • 2 large egg yolks
  • 2 1/4 cups all-purpose flour

This is a basic butter cookie. Cream butter, sugar, salt, and almond extract. Add egg yolks one at at time, then the flour. This gets rolled into a log, refrigerated, sliced, and then baked at 375 degrees F for 14 minutes.

In this book she has two of these butter cookie recipes. The difference is 1/2 cup sugar in the dough. The decorating/finishing is different as well. In the above recipe the logs get brushed with egg and rolled in course sugar. The second recipe has 1/2 cup less sugar in the dough and an indentation is made and filled with jelly.

I made the above batter and did both of the finishing touches.

For the recipes in this book the author talks about the science of the baking in a “What This Recipe Shows” section.

For my “What this recipe shows” is that 1) I did not get the dough mixed very thoroughly as butter spots kind of burned the edges on some, 2) I have difficulty evenly slicing cookie dough logs, and 3) I am not that big a fan of butter cookies. These were tasty enough but not my “go to” cookie of choice.

Oatmeal Bars

This is a recipe from The New England Table by Laura Brody (2005). Bar cookies are appealing because they bake all at once. I need to bake more cookies as the first set was eaten with early December family visit. I want to make another cookie tray. I had these ingredients so thought I would give it a try for cookies for the Christmas Eve feast.

  • 1 cup butter
  • 1 1/3 cups brown sugar
  • 3/4 cup light corn syrup
  • 1 tablespoon vanilla
  • 5 1/3 cups oats
  • 1 cup dry roasted peanuts, roughly chopped

Preheat oven to 350 degrees F. Butter the sides and bottom of a 13 x 9 inch pan. Butter it well.

Cream the butter until creamy. Add brown sugar until light and fluffy. On medium speed add the corn syrup and vanilla. Then stir in the oats and peanuts. Press this into the pan and bake for 15-17 until surface is dry and edges have just begun to turn brown. Well, the surface was not dry. So I added 5 more minutes to the baking time. And then turned the heat off but left it in the oven for ten more minutes. The edges were brown but at least now the interior was set.

For the glaze:

  • 1 3/4 cups chocolate chips
  • 1 cup smooth peanut butter

Melt this and stir until smooth. I made about half of this amount with dark chocolate and chunky peanut butter. Spread this on the bars when they are somewhat cool. Cut when cool.

Thoughts: as I was making these I thought to myself that this is a super sweet baked oatmeal or an oatmeal-peanut butter fudge. They are very sweet and will stick to your teeth. Be sure to cut them into small squares. The recipe says 54. Hubby thinks they could be cut even smaller.

Sourdough Coffeecake

I made a sourdough starter using the Cook’s Illustrated (Sept &Oct 2016) instructions. Then I made sourdough bread from a King Arthur Flour sales flyer. None of these have pictures. Since one has to feed the starter each week and there is always the “discard” I decided to make a coffee cake. I used a recipe I had printed from 2005 from Allrecipes.com. (All rights reserved…so I am just posting a picture of the recipe. Someone has since posted a version on that website which is slightly different than this one.)

This is a lovely and flavorful coffeecake. I substituted walnuts and Craisins for the pecans and raisins. I did not make the glaze. This cake keeps well covered on the counter for a week. Then it was all gone!

Miscellaneous thoughts from my kitchen: I started watching GBBO again and am having to catch up several seasons. Sometimes it inspires me to bake new dishes. I want to try Macarons. I think the show refers to all cakes as “sponges” whereas I think of a sponge cake as different than a butter cake. The show I watched recently had the technical challenge to make a lemon meringue pie. Well, I did not make a pie, nor meringue, but a nice lemon curd which I attempted to put into puff pastry (store bought) hand pies. Paul and Pru would not be pleased!

Seasons blessings to all!

Chicken Tikka Masala

This is an adaptation of the recipe from Cook’s Illustrated October 2007 magazine. I had recently pulled out the season’s past issues and chose a few recipes to try. This is something I order if eating out so I thought I would give it a try. The ingredients are basic except for the Garam Masala but I have that spice mixture in my pantry. However, I found that I did not have ground cumin. And not being sure of what is an appropriate substitute I used a shake of Garam Masala. I also used chicken thighs instead of skinless chicken breasts, and left the thighs whole when serving. Serve over rice.

For the chicken:

  • 1/2 teaspoon ground coriander
  • 1/4 teaspoon cayenne
  • 1 teaspoon table salt
  • about 1/2 teaspoon garam masala
  • 7 chicken thighs
  • 1 cup plain Greek yogurt
  • 2 Tablespoons vegetable oil
  • 2 teaspoons minced garlic
  • 1 Tablespoon grated fresh ginger

Mix the first 4 ingredients and press into the chicken thighs. Refrigerate this for 30 minutes. Whisk the last four ingredients in a bowl large enough for dipping the chicken pieces.

Heat oven to broil. Put shelf about 6 inches from broiler. Prepare a foil-lined baking pan with wire rack. I sprayed the rack with cooking spray to help prevent sticking. With tongs dip each piece of chicken in the yogurt mixture and arrange on the rack. Yogurt should thickly cover both sides of chicken. Broil chicken for 10 minutes on each side until internal temperature registers 160 degrees F. There will be nicely charred spots on the chicken. I had thick thighs (ha ha!) so turned the chicken an additional time for about 5-10 minutes.

For the sauce:

  • 3 Tablespoons vegetable oil
  • 1 medium onion, chopped
  • 2 teaspoons minced garlic
  • 2 teaspoons fresh ginger
  • 1 small dried red chile, seeds removed, minced
  • 1 Tablespoon tomato paste
  • 1 Tablespoon garam masala
  • 2 teaspoons sugar
  • 1/2 teaspoon salt
  • 1 28-ounce can of crushed tomatoes
  • 2/3 cup half-and-half

The sauce can be prepared while the chicken broils. Heat oil and cook onion about 8 minutes, stirring occasionally. Add garlic, ginger, chile, tomato paste, and garam masala, stirring for about 3 minutes. Add crushed tomatoes, sugar, and salt. Bring to a boil. Reduce heat and simmer for 15 minutes. I simmered this until my chicken was done. Then add half-and-half and return to simmer. Remove from heat. Cover to keep warm.

For serving: Add hot chicken to sauce. I had to spoon the sauce on top of the chicken to cover. Put heaping scoop of rice on plate. Place chicken with sauce on top.

My thoughts: This recipe has a lot of ingredients and is a bit fussier than usual for me. But this made three meals for Hubby and me so was worth the time and fussiness. I have in the past bought a jar of masala sauce and poured it over chicken to bake. This homemade sauce is much tastier than that was. Plan at least one-and-a-half to 2 hours to make this dish.

Pork with mustard and capers

This is an adaptation from Jacques Pepin’s recipe (Essential Pepin, 2011). It sounded like a nice dish and I served it with mashed potatoes as suggested. He calls for brown sauce which is most likely a demi-glaze which I was not about to make. I substituted beef broth with some cornstarch. I used scallions instead of chives and siracha for the Chinese hot sauce.

  • 4 pork loin chops
  • salt and pepper, to taste
  • 2 tablespoons butter
  • 1 onion, chopped
  • 2 teaspoons minced garlic
  • 1/2 cup white wine
  • 1 teaspoon siracha
  • 1 tablespoon Dijon mustard
  • 1/2 cup beef broth with 1 teaspoon cornstarch
  • 2 tablespoons drained capers
  • 2 tablespoons snipped green parts of scallions

For the pork: sprinkle each side with salt and pepper. Melt butter in skillet and cook over medium heat 5 minutes per side. I used a cast iron skillet that fit the four pork chops nicely without crowding. Remove to platter or pan and keep warm in the oven at 150 degrees F. Cover with foil.

For the sauce: Add the onion and garlic to the skillet and sauté for 2 minutes. Add the wine and boil until only 2-3 tablespoons of liquid remain. Add the siracha, mustard, and broth mixture, reduce heat, and simmer for a minute or two. Add the capers. Pour the sauce over the meat, sprinkle with the green parts of the scallions, and serve.

And for leftovers: Cook up some egg noodles, sauté more chopped onion, add one cup of mixed vegetables, dice up remaining pork chops with sauce. Put all together and serve with topping of some parmesan.

Thoughts: very tasty. The pork chops were tender and moist. The sauce was flavorful with the Dijon and the capers. I had reduced the amount of the hot sauce so it had a bit of bite but not too much. Although the original recipe calls for 6 pork chops, The sauce was just enough for the four. I would double the sauce if adding more pork chops.

Pumpkin Bread

It’s been awhile since I have written but now it is bread baking season and I have no long camping trips planned. I have perused my cookbooks and have listed various dishes I want to cook and bake. Sometimes I find recipes of interest on the internet as well as other blog sites. I also have tried and true recipes that I repeatedly use. Not always of interest to write about. But then there is this…

I made Food Network Kitchen’s Pumpkin-Shaped Pumpkin Bread. It is a simple recipe to follow and you most likely have everything in your pantry. I did not make the Spiced Pumpkin Butter. Here is the link to the recipe: https://www.foodnetwork.com/recipes/food-network-kitchen/pumpkin-shaped-pumpkin-bread-8849742

My thoughts:

It is important to use kitchen twine. I found that I did not have enough, 3 lengths of 24 inches, so used a length of cheesecloth for the third string. I had to carefully tweeze threads out of the indentations after baking but no real harm done.

The instructions were to tie the twine not too tightly. I think they must have made several loaves to get the right tension. I think I should have not used the cinnamon stick to hold up the twine. I probably thought that the bread would rise enough on the second rise to make it taut. But it did not. Still, it does look like a winter squash of some kind!

My cinnamon sticks are apparently too old. It did not fill the kitchen with a wonderful aroma while baking.

I ate a wedge for breakfast and found it had good flavor and a dense texture, but not too dense.

This was baked with a new batch of yeast packets. I had baked a pumpkin yeast bread earlier in the month but found that the yeast had gone past…disappointing because it was less than a year old and I had it stored in the fridge. So if you have a big batch of yeast in a container somewhere check it for life before investing it in baking bread.