Dry-aged steaks

I was reading, again, my various Cook’s Illustrated magazines looking for seasonal recipes to try. A magazine reader had written in about dry-aged steaks and wondered if this could be done at home. (Reference the March-April 2010 edition of the magazine). The editors replied about their efforts and I decided to give it a try.

  • 2 top sirloin steaks (about 6 ounces each?)

Wrap thoroughly with cheesecloth and place on a rack in the back of the refrigerator (where it is coldest) for four days. Pan sear and enjoy. Supposedly these are tender and intensely flavorful like the more expensive dry-aged steaks. Cook’s used 2 rib-eye and 2 strip steaks.

  • I put mine in the fridge on a Monday and we cooked them on a Saturday so that was a bit longer than the magazine.
  • I wrapped mine while they were still frozen.
  • They had a nice flavor but were not particularly moist or tender.
  • Hubby says the verdict is still out as these were some of the leftover pieces from a top sirloin butt that he had cut up earlier this year.
  • He would like to try this with rib-eyes.


Cook’s Cookies: Gingered Sugar

I have forsaken Sister’s tried and true sugar cookie recipe for the magazine’s. Cook’s Illustrated Holiday 2007 boasts The Best Sugar Cookies. Well, I thought I would see about that. They had a gingered option and because I love all things ginger, I made that version. I always have fresh ginger root in my freezer.

  • 2 cups all-purpose flour (someday I am going to make everything with whole wheat pastry flour but not today)
  • 1/2 teaspoon baking powder
  • 1/4 teaspoon salt
  • 16 tablespoons unsalted butter, softened (I always use unsalted butter; I suppose if you use salted butter you could leave out the salt, but I am not certain of that.)
  • 1 cup sugar, plus 1/2 cup for rolling dough
  • 1 tablespoon light brown sugar
  • 1 large egg
  • 1 1/2 teaspoons vanilla

And for the gingered version:

  • in food processor, process 1 teaspoon (I used 1 inch fresh ginger root, peeled and minced) with the 1/2 cup sugar for rolling the dough for about 10-20 seconds. place this in a shallow bowl
  • add 2 tablespoons chopped crystallized ginger to the sugar along with the eggs and vanilla

Preheat oven to 375 degrees F. Line baking sheets with parchment paper.

Whisk dry ingredients together in medium bowl, set aside. In bowl of electric mixer, beat butter, 1 cup sugar and brown sugar until light and fluffy about 3 minutes. Add egg, vanilla, and crystallized ginger and beet about 30 seconds until combined. Add dry ingredients and mix until just combined; scrape down sides of bowl as needed.

Form dough into 1 to 1 1/2 inch balls and roll in the ginger sugar. The sugar was moist probably because my ginger was from the freezer. This actually helped it stick to the dough nicely. Place 2 inches apart on lined baking pans. Now butter a bottom of a drinking glass and dip in the gingered sugar and flatten each cookie to 3/4 inch thick.

Bake 15 minutes. Edges will be lightly browned. These spread some in the baking. My second pan kind of spread together but not too much. That doesn’t affect the taste.

IMG_0713

These have a nice sugary crunch on the outside and are slightly chewy on the inside. The ginger is very subtle. I like them and so does Hubby. And we tend to think of sugar cookies as rather bland, but not these.

Cook’s Cookies: chocolate chip

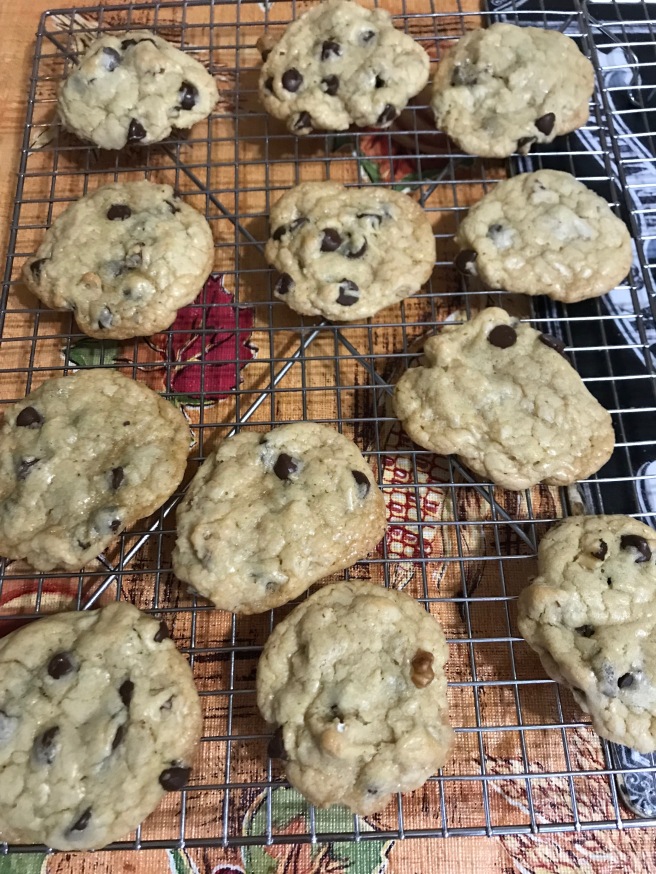
This is the absolute best chocolate chip cookie ever! Cook’s Illustrated May/June 2009 calls it “The Perfect Chocolate Chip Cookie.” I must agree. The only adaptation I make is using dark chocolate chips and not making them as big. The Cook’s way makes 16; I make 36.

  • 1 3/4 cups all-purpose flour
  • 1/2 teaspoon baking soda
  • 14 tablespoons unsalted butter
  • 1/2 cup white sugar
  • 3/4 cup packed brown sugar
  • 1 teaspoon salt
  • 2 teaspoons vanilla
  • 1 large egg
  • 1 large egg yolk
  • 1 1/4 cups dark chocolate chips
  • 1 cup chopped walnuts

I baked these at 350 degrees F. I just reviewed the recipe and it said for 375. Oh well!

This is the secret: heat and lightly brown 10 tablespoons of the butter being careful not to burn. This will take 3-5 minutes. Swirl pan during this time, or stir. Pour this into the mixer bowl and add the rest of the butter; stir until it is melted.

Add both sugars to the bowl along with the salt and vanilla. Whisk (I am using a beater here) until fully incorporated. Then add the egg and egg yolk and mix for 30 seconds. Let rest for 3 minutes. This is a bit fussy but is worth it. Do this 30 second/3 minute rest two more times. Stir in flour mixture and then chips and nuts.

I spooned heaping tablespoons of dough onto parchment lined baking pans. And baked them for 9 minutes. Let them set on the pan for one minute before removing to wire racks to cool.

IMG_0709

I have tried the browning of the butter in other chocolate chip cookie recipes but it does not come out the same. When I first made these my son enjoyed the batter so much he wanted me to make some of the cookies without the chocolate chips!

Cook’s Cookies: chocolate

It’s cookie baking time and being the season of the year that it is one would think that I would be making Christmas cookies, but no. I have found the most wonderful chocolate cookie from Cook’s Illustrated January/February 2009 edition. I was in awe of this cookie when I first made them. This is a cookie that I could have one or two with a cup of tea and be satisfied. Now that is unusual; with homemade cookies I can eat and eat and eat them, especially fresh out of the oven. But these are so rich and satisfying of that chocolate craving that one can be enough! This is my adaptation; I am not so fussy as the magazine.

  • 1 1/2 cups all-purpose flour
  • 3/4 cup cocoa; I use Hershey’s, don’t know if that is Dutch processed or not?
  • 1/2 teaspoon baking soda
  • scant 1/2 teaspoon salt

Whisk all the dry ingredients together in a bowl.

  • 1/2 cup molasses; the original recipe calls for dark corn syrup
  • 1 large egg white
  • 1 teaspoon vanilla

Whisk these together in a small bowl.

  • 1 1/2 sticks unsalted butter
  • 1/3 cup brown sugar
  • 1/3 cup sugar

Cream these together until light and fluffy about 3 minutes. Beat in egg mixture until fully incorporated and then the flour.

  • 1 cup dark chocolate chips; I used Hershey’s special dark since the original recipe calls for 4 ounces of bittersweet chocolate chopped into 1/2 inch pieces.

Stir in the chocolate chips. Chill in fridge if desired; I did not bother. I had read that using wet hands to shape the dough into balls prevents the dough from sticking to the hands. It does work, somewhat. Roll the dough into balls. Make these uniform in size and adjust baking time accordingly. I used heaping tablespoons. Then roll in the sugar and place 2 inches apart on the parchment lines baking pans.  Bake for 10 minutes. Let rest on the pan for at least one minute before removing to a wire rack for cooling.

IMG_0708

I should have taken a picture of one with a bite out of it so you can see the darkness of the soft interior with a crispy outside. But I put them away so I would not feast on them over the course of the week, before packaging them to send to my favorite airman!


Breton Butter Cake my way!

The weather has cooled down a bit and baking seems like a good idea. I have been going through my magazines and marking the recipes I want to try, one of which is a French butter cake. This I found in January/February 2017 edition of Cook’s Illustratedhttps://www.cooksillustrated.com/articles/368-french-butter-cake?incode=MCSCD00L0&ref=new_search_experience_1.

I forgot to find Californian dried apricots while shopping so had to decide what type of filling to make. I looked into my  French Feasts cookbook and found some tasty sounding fillings for gateau roule. And then I just took out an open jar of lemon curd and decided to use that one. Now also in this book is a recipe for Breton Butter Cake. This one is not filled. I compared the recipes and decided I would try the French Feasts‘ recipe but use the magazine’s techniques. And this would allow me to use my  8-inch cake pan with the removable bottom. Yay!

  • 2 2/3 cup all-purpose flour
  • 1/2 cup sugar
  • 2/3 cup soft brown sugar
  • 1/4 ounce yeast (2 1/4 teaspoons)
  • 1 cup salted butter (I used unsalted butter with every intention of adding one teaspoon salt, but forgot to add the salt!)
  • 4 egg yolks (3 for the batter and 1 for brushing on top)
  • 2 tablespoons rum

Yeast in a cake! And no rising time! How will this turn out?

  1. Mix together the flour, sugars, and yeast. Grate the cold butter and add to the mixture along with three egg yolks and knead together. This will be crumbly. Well, I cut the butter into tablespoons and chopped it up a bit and put it in the mixer bowl. I then added all the other dry ingredients and mixed it up in the Kitchen Aid stand mixer. This got crumbly and I added the egg yolks and rum. It then came together into a stiff batter.
  2. Place a sheet of parchment paper in a tart pan than is about 8 inches in diameter and spread the dough over its base. Beat the remaining egg yolk and brush it on the dough. Ridge the dough surface with a fork. So I followed the magazine and spread half the dough onto the base of the pan. I then spread the 1/2 jar (about 6 ounces) of lemon curd on the base to about 1/2 inch from the edges. I placed this in the freezer for about ten minutes. Per Cook’s this will freeze up firm enough to put the second half of the batter on top. I forgot completely that lemon curd does not freeze firmly. Oops! I then attempted to spread the second part of this dough on top. I should have rolled it out into an  8-inch circle and put the whole thing on top all at once. Live and learn. I had to put pieces around the edge to stop the lemon curd from spreading to the edge. I did my best and then brushed the top with egg yolk and ridged it with a fork. IMG_0218
  3. Bake in preheated oven 400 degrees F for about 25 minutes; then lower the temperature to 350 F and continue cooking for 15 minutes. Allow the cake to cool in the oven with the door open. I baked it as directed but decided to let it cool on a wire rack for 30 minutes per Cook’s. The cake was ready to have the pan removed right out of the oven, no need to run a knife around the edge to loosen. IMG_0219
  4. When the cake is lukewarm, wrap it in foil. This cake is better when it is not so fresh–the day after, or the day after that. We cut this baby up after the 30 minutes! IMG_0226Actually we waited a bit longer and cut and ate a slice while we were watching a Poirot mystery set in the French Riviera. That seemed appropriate.

I first was concerned that it was not fully baked around the filling but this was hard to tell given the lemon curd was not distinct from the rest of the cake. It was firm on the outside, top, bottom, and sides. it was dense. It tasted delicious!

And how did it taste the next day? Still delicious. A little gummy but that gives it a fudge-brownie type texture. The lemon filling is marvelous in this cake. The outside of the cake gave it a shortbread type of feel. It is definitely not the American butter cakes I grew up baking and eating. But this I will make again.

Fresh Fruit Tart

Okay, folks, I really, really, intended to follow the recipe to the “t” but just didn’t. What can I say?

Cook’s Illustrated July/August edition has a test-kitchened version of the fruit tart, you know, the kind you see in the bakeries each summer when the berries come into season. The kind on a layer of pastry cream or pudding. This new and improved version is supposed to stay together when cut in filling and crust. Hubby thinks this type of fruit tart is a great thing so I intend to make this. It has a pat-in-the-pan crust and a no-cook filling. Sounds easy to me.

I traipse off to the store to buy mascarpone cheese and white baking chips. Yes that’s what is in this, along with lime juice and zest. I’m cheap and just was at my local chain grocery so bought blueberries and strawberries which were less expensive (by a lot!) than raspberries and blackberries. No fresh peaches so I didn’t use those either. I forgot that kiwi makes a nice edition too, so just blueberries and strawberries for us.

The recipe is simple enough. It calls for using freshly sliced peaches to make an edible slicing guide. Good idea. It added lime to the filling to give it oomph. And the white baking chips hold the cheese filling together without cooking.

  • 1 1/3 cups flour (I read this wrong and used 1 1/2 cups.)
  • 1/4 cup sugar
  • 10 Tablespoons unsalted butter (can be browned in a skillet, stirring frequently, for 2-3 minutes. Watch carefully as it can burn.)
  • pinch of salt
  • 2 Tablespoons water (apparently browning the butter cooks off a lot of liquid which is needed for the flour to hold the crust together.)

So I make the crust, almost exactly. I did not brown the butter to give it a nutty taste. I melted the butter, added the water, the flour mixture, and patted it into a 9 inch Pyrex pie pan. The tart pan I have does not have a removable bottom and is about 12 inches in diameter. I thought that would be too big. Now, thinking about it, it might have worked anyway. And I may not have needed to add the whole 2 Tablespoons of water.

The crust gets baked in a 350 F oven for 30 minutes, turning half way through. It is also baked on a wire rack placed in a rimmed baking sheet. Let cool completely. Note to self: this may be the way to bake pies in the future.

I cored then cut supermarket strawberries in half and washed 1/2 pint of blueberries. The glaze is supposed to be made from apricot preserves but when I opened the jar, I found that the little bit left was not fit for human consumption. Into the compost bucket with it! All I have now is dark jellies. I consult with Hubby and we agree that I can use the dark jelly for a glaze since I am using berries anyway. We have a wonderful berry preserve from a local farm and it is made from blackberries and blueberries. Cook’s calls for 1/3 cup. I use about 1/4th.

Meanwhile for the filling.

  • 1/3 cup white baking chips
  • 1/4 cup heavy cream (I bought and used whipping cream because I would have more uses for the remainder in the pint carton.)
  • 1 teaspoon grated lime zest plus 7 teaspoons juice (This supposedly needs two limes. Well, the zest from one lime was a tablespoon and the juice was a few teaspoons at best. I figured the extra zest would make up for the juice and only used one lime. After all, one needs them for Lime Rickeys and G&Ts!)
  • 6 ounces mascarpone cheese at room temperature. (I used 8 ounces because that was the size of the small tub that I found at the grocery store.)

I really did have every intention of following the recipe exactly. But as you can see from my notations above I did not.

Melt the baking chips with the zest, a pinch of salt, and the cream. Do this in the microwave for ease. It took less than a minute to melt it to a smooth consistency. Now add 1/3 of the mascarpone and whisk. Then add the 6 teaspoons of lime juice and the rest of the cheese. Whisk til smooth and pour into the completely cooled crust. Arrange fruit as desired.

20170611_184946938_iOS

Melt the preserves with a little lime juice (this teaspoon came from a jar) and carefully glaze the fruit avoiding the crust. Well, this is easier said than done. As mentioned above I had a dark glaze and there were gaps between the fruit. This is to be put in the refrigerator for 30 minutes.


So did this new improved tart meet its goals? Yes it did. Life is too short not to eat dessert when it looks like this. I admit it is not as pretty as the ones in the bakery or the picture in Cook’s Illustrated. But it is in my kitchen ready to eat. And the crust and filling did not break apart or ooze out when cut. Yay! I see no need to let it sit out for 15 minutes before cutting, either. Also farm fresh strawberries will be tastier than supermarket berries. I will have to look out for some next time I pass a farm market or stand.

20170611_185110621_iOS

Millionaire’s Shortbread and Citrus Salad

20170129_225944718_ios

For this weekend’s dessert bake I made Millionaire’s Shortbread from the Cook’s Illustrated magazine. I had never really heard of these. They are apparently a rich British cookie.

I selected this recipe because I actually had all the ingredients called for exactly. This is a rare thing for Cook’s recipes and my pantry. I also followed the recipe verbatim. This is very unusual for me. When cutting the bars I did get cracked chocolate so I am not sure what happened there.

This recipe is from the November & December 2016 magazine. I tried to get the link but one has to subscribe to get this recipe. I have the magazine and it is on page 14-15. It’s a possibility that I can subscribe on-line because I have a subscription to the magazine but I have no clue as to how. Oh well! That being said, I don’t know if I should actually share the recipe? It’s not really mine to share!

A tray of these will go with Hubby to work to share with his co-workers, and I will take a plate as well to share with mine. The rest we will keep to nibble on for a bit of sweet during our week.

Speaking of Cook’s Illustrated, I did make their Citrus Salad with Arugula, Golden Raisins and Walnuts. The link is here, Citrus Salad. This was labor intensive to prepare the 2 grapefruits and 3 oranges. One had to peel, take all the pith off, remove seeds and slice. I used regular raisins because that is what I had on hand. It looks really nice.

20170115_223700226_ios

I used green onions in the dressing instead of scallions. I dressed the fruit and then spooned it on the greens. I thought then that I could have a nice citrus fruit salad to serve with cottage cheese for lunch or breakfast on the following day. But noooo…

Ingredients for the dressing:

  • 3 tablespoons olive oil
  • several green onions, white and green parts
  • 1 teaspoon Dijon mustard
  • 1/4 cup raisins
  • 1/4 cup toasted, chopped walnuts
  • a pinch of salt

The dressing was very nice. The salad was refreshing the evening I served it.But the next day the fruit tasted odd. Not good. Odd, as in maybe it went bad, odd? Next time I will keep all three parts separate and mix together only when ready to serve and only what will be eaten at that particular meal. I will make the dressing alone and use that for salads.