Lemon Meringue Pie

I have posted on making a lemon meringue pie before Birthday pie: lemon meringue. This is a different recipe. I baked this pie for the same purpose as this year our favorite Airman is home with us for her birthday. And again she requested a lemon meringue pie. This year’s pie is from PCV Emily, now RPCV. I make her pie crust as my go-to crust and you will find that one here. The apple cider vinegar and egg pie crust is fabulous. Each batch makes three nine inch crusts. I made two batches. I use my food processor for easy mixing.

When Emily sent my son the recipe for the pie crust she also sent recipes for some pie fillings, one of which was Lemon Meringue. I went with that this year. It calls for 6 eggs. The ingredients were not as clear as I had hoped. But I figured them out and the pie was a big hit. And turned out better this year than two years ago.

For the Lemon Curd:

  • 1/2 cup lemon juice and zest of those lemons (how many lemons is this? I used 4 and had to add a bit of bottled lemon juice to make 1/2 cup. The lemons were small and I got tired of juicing them!)
  • 3 whole eggs (save the whites for the meringue): this is understandable
  • 3 egg yolks (this makes it confusing: is this from the above eggs? or is it a total of 6 egg yolks?)
  • 1 cup sugar
  • 8 Tab butter cut into pieces (this is one stick=1/2 cup)

I decided to use 4 egg yolks and 2 whole eggs, saving the 4 egg whites for the meringue. Mix all the ingredients into a heavy saucepan. Stir constantly over low heat so nothing sticks to the bottom and the eggs don’t scramble. Do this until one boil bubble comes to the top. This will take awhile. You could strain this through a sieve to remove seeds and zest but I like zest and there were no seeds in my lemon juice.

Now make the meringue. This turned out really well. I was very pleased.

  • 4 large egg whites
  • 1/4 + 1/8 tsp cream of tartar
  • 1 cup superfine sugar (whirl the sugar in a food processor to make it superfine)

In a bone dry and very clean bowl beat egg whites and tartar with a mixer until very foamy. Slowly add in sugar as you continue mixing. Mix until stiff peaks have formed.

Now here’s where I wasn’t prepared. The pie crust needed to be pre-baked. This would have easily been done while I was preparing the filling, but I didn’t think to do this. So I now have stiffly whipped meringue in my mixer bowl and fully cooked and hot lemon curd in my saucepan. And I had used a pyrex 8-inch pie dish and still have no pie beans for pre-baking! And I had deliberately placed the pie crust in the dish in the freezer to prevent shrinkage, but had it out at room temperature while I was preparing the curd and meringue, and now I have to pre-bake. I end up with a little shrinkage and a bit of soggy bottom at the end. Life goes on.

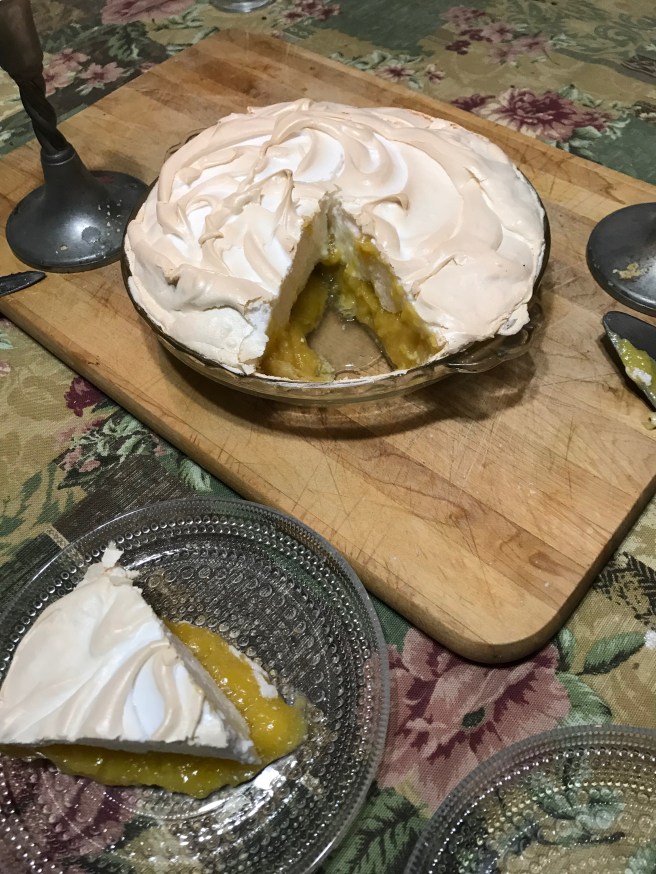
Spread the curd into the pre-baked (mine was half-baked) pie crust. Pile the meringue on top. I had lots of meringue. Bake at 350 degrees F for 15-20 minutes until meringue is lightly browned.

Happy Birthday Val!

IMG_2090
This was cut while slightly warm. The curd firmed up the when completely cooled.


Cake from a Box!


I found a box mix at one of those big warehouse type stores that sell odd items, discontinued stuff, and leftovers. The ingredients are your basic recipe ingredients: sugar, flour, cocoa, corn starch, canola oil, baking powder, and salt. I had to buy this; actually I bought two boxes. I’m thinking that I could make my own cake mixes by mixing up the dry ingredients and listing what wet ones to add. For this box mix one adds 1 1/2 cups milk, 1 stick butter, and three eggs. I’m not sure how they got the canola oil in the mix.

I love German Chocolate Cake. Either myself or a family member makes or buys one for my birthday. It is not my birthday, no where close. I have previously made a German Chocolate Cake just for fun, also not for my birthday. That post is Cake Envy

This was super easy to make. I baked it in my 8-inch round cake pans. I then made the frosting from the side of the box for the classic Coconut Pecan Frosting.

  • 1 cup sugar
  • 1 cup canned evaporated milk
  • 1/2 cup butter, softened
  • 3 eggs, beaten
  • 1 tsp vanilla
  • 1 1/3 cups flaked coconut
  • 1 cup chopped pecans

Cook all this except the coconut and pecans in a sauce pan. Bring to boiling and then cook over medium heat 4 to 5 minutes, until slightly thickened. Stir in the coconut and pecans. Cool completely before frosting the cake.

What could be simpler? Well, it usually helps to read the recipe several times. I put in an entire can of evaporated milk so that was 1 1/2 cups. I cooked this longer than the 5 minutes because it was not getting thick. I admit I also had to pick out a few small pieces of scrambled egg! After cooking and stirring in the coconut and pecans it seemed more pudding like than frosting. I contemplated making it into a German chocolate trifle. But I persevered and stuck it in the fridge to firm up. And voila! It worked!

popovers that did not pop

IMG_2055

I baked popovers to go with leftover soup. I used my favorite popover recipe which is in a cookbook entitled The Cookie and Biscuit Bible. I must be catching up on my Bible reading as I recently checked out some other food and cooking “Bible” books from my local library. Anyway this popover recipe is simple and has always turned out well. It is my favorite but it is also the only popover recipe I have ever used.

  • 2 Tab. butter, melted
  • 3 eggs
  • 1 cup milk
  • 1 1/2 cups four
  • pinch of salt
  • a few sprigs of fresh herbs

I confess that I did not have milk in the house, nor fresh herbs. Well, there is a thriving bunch of parsley but I wasn’t keen on using that in popovers. So how do you make popovers without milk? I used 3/4 cup half-and-half with 1/4 cup water. For the herbs I decided to use 1/2 tsp dried fine herbs and 1/2 tsp dried tarragon.

Heat oven to 425 degrees F and spray/grease a twelve cup muffin pan.

Beat the eggs in a stand mixer until blended and then beat in the milk, then the melted butter. Sift the flour and salt and gradually beat this into the egg mixture. Stir in the herbs. Pour the batter into the prepared pan and bake for 25-30 minutes. Do not open the oven until done. These should have popped over the tops of the muffin cups and then slowly deflate when removed from the pan.

So what happened? Not sure but the heavier milk may have been an issue. I also may have beaten it too long and hard. I had read somewhere that the batter should be beaten for three minutes to be sure there is plenty air incorporated. Well, I started the beating with the eggs and kept the mixer going to the very end. This may have been 6-8 minutes since I did not have mise en place and everything ready to add in the proper order.

But all was not lost. These came out like an egg-y muffin and sopped up the soup broth just fine. Now what to do with the four that we didn’t eat?


Apple Crisp

Fall is in the air! I know this because I have gotten out a bunch of cookbooks and have gone to the library and checked out a few as well. I think about baking; I bake; I think about baking some more.

Apples: we bought some nice locally sourced Gala apples as these are one of our favorites for eating. It is a portable fruit. Hubby goes off to work with an apple, a piece of cheese, and granola bars, none of which is homemade. We then bought five pounds of more apples, also locally sourced, with the express purpose of making apple pies, muffins, tarts, etc.

So this week’s apple recipe is an Apple Crisp. This is from King Arthur Flour’s 200th Anniversary Cookbook. They had posted one on line but I think that may be different. Not sure. Anyway this is a good one. I did add my own flair to it, though.

  • 4 cups chopped apples, peeled (KAF said this was about 8 apples, so I peeled, cored, and chopped exactly 8 apples.)
  • 3/4 cup all-purpose flour
  • 1 cup brown sugar
  • 3/4 cup oatmeal
  • 1/2 tsp salt
  • 1 teaspoon gingerbread spice mix (my addition: original recipe called for 3/4 tsp cinnamon and 1/4 tsp allspice)
  • 1/2 cup butter, softened (I melted mine)
  • 2 Tab. chopped candied ginger (my addition)
  • 1/4 cup dried cranberries (my addition)

Put chopped apples in lightly greased (or sprayed) 8-inch square baking dish. Sprinkle on the cranberries and the candied ginger. Blend the dry ingredient and add the butter. Melted butter (somewhat cooled) mixes in nicely. Stir until all ingredients are not dry. Put this on top of the apples. I patted it down like a crust. Bake 35 minutes at 375 degrees F.

IMG_2054

This came out well. Hubby said it had a “grown up taste”, not sure what that means. The topping was crispy and contrasted with the apples very well. In future I would reduce the brown sugar to 3/4 cup sugar as I think the topping doesn’t need that much sweetness. We did not have ice cream in the house and that would add a nice finish to this Crisp.

Apple “cup-pies”


I have made mini apple pies in a cup cake pan. The recipe is http://www.livewellbakeoften.com/mini-apple-pies/. I found this by googling apple pies looking for tarts.  The only adaptation I made is to brush the tops with water and sprinkle on some cinnamon sugar. I also used 3 cups of chopped apples instead of 2 1/2. I used Macoun apples. If I make these again, and it is likely I will, I would reduce the sugar by half and increase the amount of apples to 4 cups.

  • 2 9-inch pie crusts (I used store bought because I haven’t gotten around to making my own.)
  • 2 1/2 cups apples, chopped
  • 1/4 cup sugar (in the future I would use 1/8 cup)
  • 2 Tab flour
  • 1 tsp ground cinnamon
  • 1 tsp vanilla extract
  • 1/8 tsp ground nutmeg

Cut the pie crust into 12 circles about 3 1/2 inches. I used my Pyrex custard cups as the cutter. Press these circles of dough into your regular sized muffin pan. Use the leftover dough to make strips for the lattice tops. I found that four strips are needed for each mini pie.

Mix apples and other ingredients all together and spoon even amounts into the dough cups. Fashion the lattice to each. I then brushed the tops with water and sprinkled with a tiny bit of cinnamon sugar. Bake in 425 degree F oven for 20-25 minutes. Let cool in pan for 10 minutes or so and then carefully remove to a cooling rack.


IMG_2052
“good bake”

Ready, set, bake! Puff Pastry Dough

All week long for some reason I felt like making puff pastry. Actually I wanted to make a Rough Puff pastry. Can you tell I’ve just finished watching Season 5 of the Great British Bake Off? I searched on-line for a recipe to make. I found Paul Hollywood’s but just reading his name was too intimidating. So I went with Epicurious: Rough Puff Pastry Dough.

This is mostly butter. Lots of butter. In looking at PH’s recipe there seems to be less butter to the same amount of flour. Interesting. This, of course, I note in hindsight. I have made “real” puff pastry before quite a long time ago so I do not recall the difference. That will mean another internet search sometime.

  • 1 1/4 cup flour
  • 1/4 teaspoon salt
  • 1 stick, plus 5 tablespoons of butter frozen
  • 5-6 tablespoons of ice water
IMG_1937
Ready, set, bake!

The metal bowl is to be chilled but I did not want to wait. I somehow do not have a box grater so I started out with that small hand held one and ended with working the butter into the flour with my hands. I keep butter in the freezer so that was readily available.

First sift the flour and the salt. Then grate the frozen butter into the flour. With a box grater this would have been easy. Not so much with the itty-bitty one I have. I became concerned that the butter parcels would be too small so I chopped up the remaining stick of butter with a chef’s knife and rubbed it into the flour with my fingers. Then sprinkle the flour/butter mixture with 5 tablespoons of iced water and stir with a fork until it comes together. It should hold together without crumbling when squeezed with your hand. If not, add a little bit more water. At this point my hands are covered with butter and flour. Form this into a 5 inch square. Cover with plastic wrap and chill for 30 minutes.

So Hubby and I find an intriguing movie to watch on Netflix. We pause this every 30 minutes for me to go roll out the dough.

Roll out dough into a 15 x 8 inch rectangle. Epicurious says to fold in thirds. But I think I remember PH liking the four fold, fold a fourth on each small end to the middle and then fold over. So this is what I did. Cover in plastic wrap and chill for 30 minutes. Do this two more times. Now chill the finished product for at least one hour. I leave the dough in the refrigerator overnight.

Now what to do with this? Nothing too original. Tarts made with a nice all-fruit jam. Roll out the dough into a rectangle 24 x 8 inches. Cut into 6 smaller rectangles. Place a helping of jam on one half. Brush edges with an egg wash made of one beaten egg and a few teaspoons of milk. fold into your turnovers. Use a fork to seal the edges and to poke through the top crust. Brush tops with egg wash and sprinkle with sugar. I chilled these for an hour or two or three as Hubby and I were busily cleaning and de-cluttering our kitchen for a bit of remodeling. I baked these at 375 degrees F for 30 minutes. We’re still working in the kitchen and Hubby asks “What’s burning?” I guess that means my oven may need cleaning or he did not expect to smell the baking heat.

So here is our tasty treat. No soggy bottom. Hubby declares it “a good bake”. Melt in the mouth buttery and flaky.

I would make this again. Maybe tackle PH’s recipe. Or I will buy the stuff from the grocery store freezer and keep it handy to use. I guess it depends on how much I want to get my hands into the action!

Procrastibake: Streusel Coffee Cake

So my house needed cleaning. I did eventually get around to it but not before I found lots of other things to pay attention to. And baking is one of those things that is easy to get lost in especially when the weather in Southern New England switches from summer to winter every other day! This past week seems to have alternated rainy cold days with warm sunny “sit in the backyard with a cocktail” days.

This recipe is from my standard 1978/1969 Betty Crocker Cookbook. I chose not to make the sour cream coffee cake because I had cow’s milk in the fridge that needed to be used. This can be made in a 9-inch square pan or a 9 x 13 inch pan. I chose the 9-inch square.

  • 2 cups all-purpose flour
  • 1 cup sugar
  • 3 teaspoons baking powder
  • 1 teaspoon salt
  • 1/3 cup butter, softened
  • 1 cup milk
  • 1 egg
  • 1/2 cup raisins (my addition)

First of all, I only had 1/3 cup butter in the fridge. I did not want to wait for the frozen butter to thaw. And I will need 3 more tablespoons of butter for the streusel. What to do? I have a handy dandy jar of coconut oil in the pantry. It really is not an appropriate substitute for butter but for oil, but I have used in for cookies in the past, so went for it anyway. So I used 2 Tablespoons coconut oil with 3 Tablespoons butter in the cake.

Make the streusel by mixing all together the following:

  • 1/3 cup packed brown sugar
  • 1/4 cup all-purpose flour
  • 1/2 teaspoon cinnamon (I may have added some to the cake as well)
  • 3 tablespoons butter (I had 2 of butter and 1 of coconut oil)
  • 1/2 cup chopped nuts (I had used all the nuts earlier in the week so left these out)

Preheat oven to 350 degrees F. For the cake beat all of the first list of ingredients in a mixing bowl for 2 minutes, scraping bowl occasionally. Lightly grease the pan and spread 1/2 the batter in the pan. Sprinkle on half the streusel. Spread the remaining batter on top and then sprinkle with the rest of the streusel. Bake for 35-40 minutes.

IMG_1066

Oh, and I mixed in a quarter cup of oats with the streusel.

The 9 inch square pan needed 45-50 minutes to bake completely.

The amount of streusel was barely enough. I don’t think it would have worked at all as layering in a 9 x 13 inch pan. In future make twice the amount for either sized cake.

This is a nice moist cake. I will make it again. I may have actually made it a long time ago as I vaguely remember having the same thoughts about the amount of streusel.


Honey Gingerbread

Another recipe adapted from Eating Well Magazine Spring 2004.

  • 1 1/2 cups all-purpose flour
  • 1 cup whole wheat pastry flour
  • 1/2 teaspoon baking soda
  • 2 teaspoons baking powder
  • 2 teaspoons ground ginger
  • 2 1/2 teaspoons pumpkin pie spice (This is because I did not have ground cloves and I figured this would take place of the 1/2 t. nutmeg, 1 1/2 t. cinnamon, and 1/2 t. cloves. Now, in hindsight, I could have used my Gingerbread Spice Mix. Live and learn!)
  • 1/2 teaspoon salt
  • 2 large eggs
  • 2/3 cup packed brown sugar ( I had light brown)
  • 1/2 cup honey (I had a wildflower honey not the dark honey of the original recipe which also called for 2/3 cup. I used all that I had.)
  • 1/2 cup canola oil
  • 2 teaspoons orange zest (instead of lemon zest; again I used what I had.)
  • 1 cup boiling water
  • 1/2 cup finely chopped crystallized ginger (optional but I love crystallized ginger so I have thi in the house. It is wonderful to chew on a small piece for a snack.)

Prepare a 9 x 13 inch pan by spraying with cooking spray. Heat oven to 350 degrees F.

Whisk dry ingredients. Beat together the eggs, oil, honey, and brown sugar. Blend the dry ingredients with the egg mixture and zest. Add boiling water as you go along. Mix just until fully blended. I used my stand mixer and this took a very short time.

Pour batter into prepared pan and bake for 30 minutes. The top should spring back lightly when touched. Cool in pan on wire rack.

Our first piece we ate warm. It is a light version. The honey does not give quite the same flavor as molasses. I could taste the orange zest which surprised me. I would call this a honey ginger cake. The bits of crystallized ginger were very tasty. Hubby liked it a lot. He said an addition of raisins would have put it over the top. I would make this again.

IMG_0889


Cinnamon Bread

Quite a while ago Hubby asked if I could make Cinnamon Bread, or at least I think he did, but I did not make any. King Arthur Flour’s website is a gold mine of baking recipes for us home cooks. I saw this and thought I would make this. I used to bake breads all winter long but not this winter. Not sure why? Here is the link to the original recipe from KAF: Cinnamon Bread. I made a few adjustments.

  • 2 1/2 teaspoons instant yeast
  • 2 cups all-purpose flour
  • 1 cup whole wheat flour
  • 1 1/4 teaspoons salt
  • 3 tablespoons sugar
  • 1/4 cup instant dry milk
  • 3 tablespoons potato flour
  • 7/8 to 1 1/8 cups warm tap water
  • 6 tablespoons butter, at room temperature

Whisk dry ingredients together in large bowl of stand mixer. Put butter and water together in Pyrex measuring cup and microwave for 30 seconds. Add the liquid to the dry, stir to combine, and then knead for 7 minutes at Speed 2. I first used the lesser amount of water but the recipe said the dough should barely clean the sides of the bowl. With the lesser amount the dough cleaned the sides right away so I added the extra 1/4 cup. This made a more sticky dough that seemed to match the description from the recipe.

Place the dough in a greased bowl. To do this I scrape the dough to one side of the mixing bowl, spray with cooking spray, then scrape the dough to the sprayed side, and spray the rest of the bowl and the top of the dough. Cover and let rise until doubled. This took about an hour and 15 minutes.

Transfer dough to a lightly greased work surface. I did this. I had never not used a floured work surface for bread making. And this worked out well. Pat the dough into a 6 inch by 20 inch rectangle. Lucky for me my butcher block work surface has a pattern of 2 inch squares all over the top. So measuring the rectangle was to perfection!

Make the filling: 1/4 cup sugar, 1 1/2 teaspoons ground cinnamon, 2 teaspoons flour. Beat one egg with 1 tablespoon of water and brush this on the dough before sprinkling on the cinnamon mixture. This is to keep the swirl from making gaps in the bread while baking. Roll into a log starting with the short end. Pinch the ends and the long seam to seal. Place in your lightly greased or sprayed loaf pan. Tent loosely with lightly greased plastic wrap and let rise until 1 inch over the rim of the pan.

The size of your loaf pan will matter. I spent my morning measuring the three I have and they are all 9″ x 5″ pans. This loaf, per KAF, will rise more nicely in an 8 1/2″ x 4 1/2″ pan. In the 9″ x 5″ pan it will rise to the rim. Mine rose very slightly above the rim in 1 hour and 20 minutes time.

Bake in preheated 350 degrees F oven. “Allow the bread to completely cool before slicing.” Yeah right!

IMG_0878
Perfect swirls!

This was yummy and makes a nice toast with my coffee. I just have to be sure I don’t eat it all in one day; that would wreak havoc with my goal of losing a few pounds!

I like recipes from which I learn something. From this one I learned that one could substitute potato flour for instant potato flakes, using an egg wash helps the filling stay in place, and one can use a lightly oiled work surface for shaping bread dough.

Glorious Morning Glory Muffins

IMG_0875

I haven’t written for a few weeks. It’s not that I’m not cooking, I’m just not creatively cooking. Or I make standard fare that I have already written about, such as chicken pot pie and chocolate cake. We had a fabulous post New Year Thanksgiving dinner with a roast turkey and all the trimmings including sweet potatoes, cranberry sauce, stuffing, gravy, mashed potatoes, pumpkin pie and apple pie. Sometimes I just throw chicken in the oven to bake with barbecue sauce or pan sear steaks or pork chops. Frozen vegetables, in a multiple of varieties, round out the meal. And I confess, sometimes dinner is sandwiches made with frozen breaded fish fillets!

And then there is the impetus for weight loss and heart healthy cooking. Hubby and I are not getting any younger and the medical folk have been looking at our hearts regarding cholesterol levels and hypertension, and our sedentary lifestyle, a little more closely lately. So how can I bake yummy desserts with these issues in the front of my mind?

I wanted to bake something. I used to bake muffins every week so that Hubby and the Girls would have something to take along for the commute to school. The Girls are now all grown up with boyfriends and fiances and such. But a healthy muffin might take the place of cupcakes, right? I have an entire section of my recipe notebook devoted to muffins. Most of them claim to be low-fat and have whole wheat and/or oatmeal in the list of ingredients. I chose this one because it has apple butter as an ingredient and I found half a jar of good apple butter when I did a recent fridge cleaning and inventory.

Morning Glory Muffins: this is an adaptation of a recipe submitted to All Recipes.com 2005 by a Jack D. I adjusted the eggs and the amount of sugar and the raisins.

  • 1 1/2 cups all-purpose flour (in future I would use 1 cup all-purpose)
  • 1/2 cup whole wheat flour (in future I would use 1 cup)
  • 1 cup white sugar
  • 1 tablespoon cinnamon
  • 2 teaspoons baking powder
  • 1/2 teaspoon baking soda
  • 1/2 teaspoon salt
  • 2 cups grated carrots
  • 1 apple, peeled, cored, and chopped
  • 1 cup Craisins
  • 2 eggs
  • 1/2 cup apple butter
  • 1/4 cup canola oil
  • 1 tablespoon vanilla
  • 2 tablespoons chopped walnuts
  • 2 tablespoons toasted wheatgerm (I did not remember if the wheatgerm I have is toasted already so I dry toasted it in a small skillet over high heat on top of the stove)

Oven to 375 degrees F. Spray 18 muffin cups or line with papers. I was able to make 20 muffins.

Whisk eggs, apple butter, oil, and vanilla together in a medium bowl

Whisk all dry ingredients together in a larger bowl. These are the first 7 ingredients.

Add the goodies, carrots, apple, Craisins, to the dry ingredients. Then stir in the apple butter mixture just until all is moist.

Mix the wheat germ and the walnuts together in a small bowl.

Spoon into the muffin pans, sprinkle each with the wheatgerm mixture, and bake for 20 minutes. The tops will spring back when lightly pressed.

These were fabulous. I don’t remember baking these before even after printing out the recipe back in 2006. They are enjoyable warm right out of the oven, in the middle of the morning as a snack, and also the next day, and evening, and then for morning again…