These cookies I found in my Mom’s recipe notebook. I do not remember them but my sister does. I wonder if my niece does?
I wanted to make cut out cookies for granddaughter to decorate for Easter. I had been looking at this recipe and thought I would give it a go. It’s a pretty straight forward cookie recipe. The way my mother typed it out assumes the cook knows how to make cookies.So I cream the butter and sugar. Add the eggs and vanilla, then the dry ingredients. Divide the dough about in half and add the cocoa to one half. Now comes the fun part!
I have sent Hubby down to the basement to find the bags of cookie cutters. I rummage around and find the Easter cookie cutters amidst the dinosaurs, the nativity scene (oh yeah, just wait til next Christmas!), regular Christmas shapes, cats. big feet, etc.
I put the dough wrapped in plastic wrap in the fridge for 15-30 minutes so it will be chilled enough to roll out well. I roll out each of the doughs and cut out four of each shape that I want. Now you put the shapes on top of each other. Now I have used quite a bit of flour to roll out and cut the shapes. How are these supposed to stick together? I text my sister to see if she has any advice. But since she doesn’t answer right away I go ahead and put the cookies in to bake.
My sister finally texted (this is a 21st century word) back saying Mom just stacked them and baked them.”Perhaps a little egg white wash?” But I’m thinking Mom didn’t use egg wash! She may have but I did not know about it.
The cookies just bake up together:
These get packed up and taken to Daughter’s house for the Easter weekend. I pack the three packs of food dye and the container of powdered sugar as well. And let’s not forget the kitchen paint brush. Now comes the fun part!
I know that Easter is past. Life gets very busy so I don’t always have the time to write and post things as often as I had. But I wanted to share this fun roll recipe.
Don’t these look fun? And they don’t take all day to make either. I saved this recipe from a woman’s magazine ad for Fleischmann’s Rapid Rise yeast and PET evaporated milk. I am not sure the year of the magazine that I got this from. I have made these for my stepdaughters maybe 10 years ago but I think I had saved the magazine page before that.
These pretty much can be ready for the oven in one hour. Pretty good for a yeast roll.
5-5 1/2 cups all purpose flour
1/2 cup sugar
1 tablespoon grated lemon peel
3/4 teaspoon salt
3/4 cup evaporated milk
1/2 cup water
1/3 cup vegetable or canola oil
2 eggs,slightly beaten
glaze, optional
The best part about baking these rolls again was baking them with my granddaughter. She has “helped” me bake before so I thought she would want to “help” again. And she did! I even made her her own apron for the occasion.
The recipe: combine 2 cups flour, the sugar, yeast, lemon peel,and salt. Heat milk, water and oil until very warm (125-130 F); stir in dry ingredients. Stir in eggs and enough remaining flour to make soft dough. Knead on lightly floured surface until smooth, about 4-5 minutes. Cover, let rest 10 minutes.
I have not kneaded yeast dough by hand for many years. That’s what my Kitchen-Aid mixer’s bread hook is for! But I am at my daughter’s house and needs must! While I am kneading the dough granddaughter is watching and starts kneading the flour on her small board. Daughter tells me that she is trying to do what I am doing, so I give granddaughter a bit of dough and she follows my lead and does a great job. Look at the concentration on her face.
Now it is easier to work with half the dough at a time to shape the rolls. These make a good size roll and will make 18. Cut each half of dough into 9 equal pieces. I did not get mine very equal but it’s home made, so who cares? Roll each piece into a 10 inch rope. Tie into a knot with one end shorter. This will be the head. Pinch this end into a beak and put tiny pieces of craisins (dates in the original recipe) for eyes. Flatten the other end into the tail and make a few cuts. Place on lightly oiled baking sheet. (If I were at home I would have lined the baking pans with parchment paper.) Brush oil over all (or spray with cooking spray), cover and let rise for 20-30 minutes. Or cover with plastic wrap and put in fridge from 2-24 hours. We placed these in the fridge for overnight so they could be baked fresh for Easter dinner. I took them out of the fridge about an hour before putting them in the oven. Bake at 350 F for 12-15 minutes.
I had packed the recipe card away and did not remember the amount of baking time. I guessed at 20 minutes but just before 15 minutes into the baking they smelled done. And they looked done. The bottoms were a bit browner than I like and I think that was because we oiled the baking pan. I think (but don’t quote me on this) that parchment paper would have been the better choice. Optionally one can make a glaze with powdered sugar, milk or water, and food color to brush over the rolls to make them Easter colorful. I did not choose to do this.
And they were served with our Easter dinner of Prime Rib Roast (cooked by son-in-law), along with cucumber salad and mashed potatoes. Pies, Easter brownie bites, and cookies for dessert.
He is risen. He is risen, indeed! New life for all!
Hah! I finally have an excuse to make something chocolate! This is totally inspired by Sofiabakes: http://sofiabakes.com/2016/03/23/brownie-creme-scotch-eggs/
A while back I made brownies but the recipe was seriously too fussy for regular use: https://mykitchenmythoughts.com/2016/02/14/brownies/. But now I want to make some so I can put Cadbury mini-eggs in them. And then smother them with chocolate ganache! I can take these up to daughter’s family for the Easter weekend and not eat them all myself; oh okay, I would share a few with Hubby.
I bake the essential recipe’s Brownies from the Bittman How to Cook Everything Cookbook on page 881. My step-daughter swears by these brownies, well, not really swearsby them, but you know what I mean! It is super simple and makes a chewy brownie.
8 tablespoons unsalted butter
3 ounces unsweetened chocolate, roughly chopped
1 cup sugar
2 eggs
1/2 cup flour
pinch of salt
1/2 teaspoon vanilla extract
Melt the butter and chocolate. Stir until smooth. Stir in the sugar. Beat in the eggs one at a time. Gently stir in the rest of the ingredients. Pour into prepared 8×8 pan and bake at 350 F for 20-25 minutes. Do not overbake.
However I am going to bake them in mini muffin pans so will guess at the baking time. I found that they were done at 20 minutes and even though I coated the pans with cooking spray they wanted to stick to the pan a bit.
I put a mini-egg in each brownie bite as soon as it comes out of the oven. I had considered baking the candy inside but was not sure how that would work; so I didn’t. I am now thinking that the Cadbury mini-eggs are not creme eggs so the effect may not be what I am expecting based on the inspiration! I melt about 1/2 cup of bittersweet chocolate chips for the frosting. I added about 1/2 teaspoon oil so it would pour. This may be the downfall of getting the chocolate glaze to “crisp up”. I’ll give it a little time. I sprinkled the brownie bites with a spring sprinkle mix. They look a bit messy but a bit fancy too.
Let’s see what Hubby thinks of these. Maybe not the fairest test since he doesn’t really have a sweet tooth. I’ll just have to taste them myself!! Ummm, they’re good! Hubby says they are a rich chocolate with a burst of gooey richness. Success!
I do put them in the fridge to harden the glaze. The next day (yes, there are some left!) they are a nice bite of brownie with a piece of candy inside, not creamy. But they are a really rich chocolate; a bit too rich for Hubby. More for me!!
A few years ago I had seen a recipe for home made chewy granola bars made with sweetened condensed milk. I never wrote it down even though I made it several times. The last time I made it I had used a package of granola and did not like the results at all. So I am restless one afternoon. There are plenty of projects to do but nothing is striking my fancy. I really really wanted to make chocolate cupcakes but am determined not to bake any more sweets until Easter. But you all have posted some absolutely wonderful chocolate cupcakes and I am craving them! But I paw through my pantry to see what is there and decide to make granola bars. I figure these will be handy to walk out the door with in the mornings for work. And perhaps don’t really count as a sweet.
Preheat the oven to 350 F.
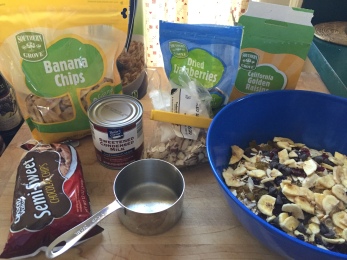
I start with 3 cups of oats. I add enough other ingredients to make just over 4 cups. I have a sneaky suspicion that the total amount of stuff should be closer to 5 cups. One can add seeds, nuts, dried fruits and just about anything granola-ish. To this batch I add coconut, banana chips, sliced almonds, golden raisins, dried cranberries, and just a few chocolate chips. Actually I use approximately 1/4 cup of each. Gently heat one 14 ounce can of sweetened condensed milk to thin. Pour over the ingredients and mix to coat everything.
I line a 13 x 9 inch cake pan with parchment paper. Pour the “batter” into this pan. I pat it down evenly with another piece of parchment paper. Bake for 25 minutes. At this point I do not remember if I’m supposed to let cool before cutting or not. I lift it out of the pan and let it cool on a wire rack. When I tried to cut it warm it started falling apart.
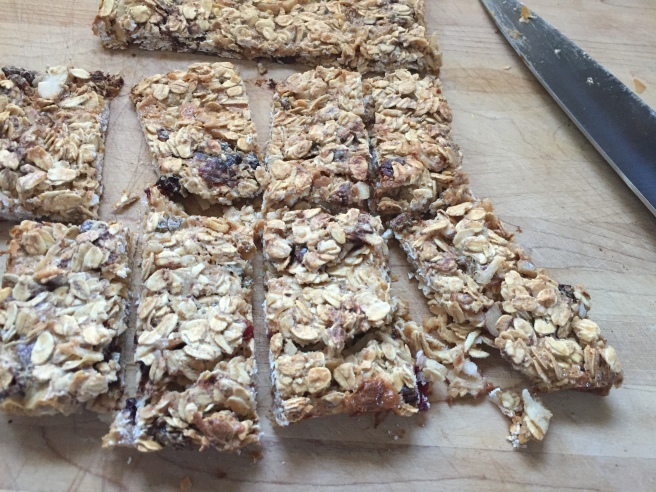
I let them cool a little bit and then I cut them into bars. The outer ones hold together better than the middle but they will firm up as they cool more.
I love parchment paper. It is a wonderful invention. Growing up my mother used waxed paper or just greased the pan with Crisco. There was always a small hand sized square of waxed paper in the Crisco can for this purpose. The second greatest invention is cooking spray.
The granola bars are a hit. Hubby says “I like the taste”. They taste like honey and oats. These will be good for Hubby to grab and go in the morning when leaving for work along with a piece of fruit. That goes for me too!
I will be able to go back to work soon. So now I feel all this pressure to get everything done that I can’t get done when I spend my days at work! This pressure comes from myself, I know this! So I have a list of sewing projects that need starting and finishing; I have a bunch of recipes I still want to try; there are books still to be read, solitaire games to play (oops!), and I have enjoyed the luxury of having mornings at my kitchen table writing and planning my days. But I am very much looking forward to going back to work, having a schedule, a broader purpose to the day, and seeing all my co-workers.
This was my lunch. I saved this three ingredient pancake recipe on one of the many Facebook feeds I get from food and cooking sites. http://www.foodnetwork.com/recipes/food-network-kitchens/3-ingredient-gluten-free-banana-pancakes.html They are more like crepes and very light and tasty with a light banana flavor. Eggs and banana: protein and fruit!
That said, I was looking for an easy bread recipe and have always wanted to make Anadama bread. Basically this is a yeasted cornbread. The recipes in my many cookbooks vary using molasses or honey, using cornmeal or creamed corn, sometimes eggs sometimes none. The origin of the bread is in New England so I thought it appropriate to get out my cookbook The New England Table by Lora Brody and see if I could make that version. This recipe is a “throw everything together in a bowl, mix, and knead”. What could be simpler?
The story, true or not, behind the bread is that a man was sent to work with cornmeal mush in his lunch box and kept asking his wife to put in bread instead. So he cursed her and added yeast, molasses, and flour himself to make the bread. I found this link to a food historian while googling the name of the bread: http://atasteofhistorywithjoycewhite.blogspot.com/2015/02/anadama-bread-new-england-tradition.html
1 1/4 cup warm water
3 cups all-purpose flour
1 tablespoon instant yeast
1/2 cup cornmeal
2 scant teaspoons salt
3 tablespoons vegetable oil
3 tablespoons regular molasses
Handy hint: it does really work when you use oil in the measuring spoon before measuring the molasses. Slides right out!
I placed all the ingredients in the bowl of the stand mixer with the bread hook attached. I mixed it up and then set it on knead (speed 2) for 8 minutes. Sticky dough! To place in a greased bowl I pushed the batter to one side of the bowl, sprayed with cooking spray, pushed it back to the other side of the bowl, sprayed that side and made sure the batter was covered with the “oil”. Covered this with plastic wrap. This was to rise one-third. So I waited an hour and it looked nicely risen to me. The instructions are to gently deflate the dough and knead in some toasted sunflower seeds but I didn’t plan to add seeds so I left this step out. I then placed the dough in the prepared pan (9 x 5 loaf pan sprayed with cooking spray). Cover this with plastic wrap and let rise until almost doubled. Spray the plastic wrap so that the dough does not stick when you uncover it.
The loaf looks good at this point. Preheat oven to 375 F. Bake for 35-40 minutes. I checked it at 35 and it looked done to me although a bit flat. When I was much younger and baking bread the loaves would rise up out of the loaf pan. What is different now? Looking up on the internet it may be that I needed to bake it for the additional 5 minutes.
Dinner that night included this fresh baked bread. It was pre-breaded fish from frozen, leftover mashed potatoes, small spinach salad with olives and feta, and a citrus salsa. The salsa recipe is from http://jovinacooksitalian.com/2016/03/02/when-you-are-in-the-mood-for-seafood/. She has some nice recipes.
(If you look closely you can see the white paws of Felix the Cat in the background. He’s eating his dinner too.)
“When the occasion calls for a light, sweet dessert, this delicious orange sponge cake is a perfect choice. Stiffly beaten eggs–first the whites, then the yolks–are the secret of its light, airy texture.”
Thus begins the intro to “the best-ever orange sponge cake” according to the McCall’s Cooking School in its 1984 recipe cards series. I have several of these cards (pages) because they came in the mail as promotional material with the hope that one would subscribe and receive a packet of recipes monthly eventually becoming an entire cookbook. Well, I just saved the pages that I got for free!
I decided to make the cake. I do not do well making sponge or chiffon cakes. I like butter cakes and do pretty good with them. In my past efforts to make sponge cakes they turn out like hockey pucks and inedible. Perhaps my baking skills have improved. I am counting on it as I begin this bake. I figure that a sponge has no butter and actually has less sugar than my usual butter cakes so that is a good thing.
In baking I may change up flavorings but generally follow the instructions exactly. Baking is a science, flavoring is the art.
6 egg whites, brought to room temperature
1 3/4 cups sifted all-purpose flour, sift before measuring
1/4 teaspoon salt
1 1/2 cups granulated sugar
6 egg yolks
6 tablespoons fresh orange juice (silly me, I only measured out 3!)
1 tablespoon freshly grated orange peel
In large bowl of electric mixer beat the egg whites until foamy then gradually beat in 1/2 cup of the sugar, 2 tablespoons at a time, beating well after each addition. Beat until stiff peaks form. Preheat oven to 350 F.
Sift the sifted flour with the salt onto a plate or sheet of waxed paper; set aside.
In another bowl beat the egg yolks until very thick and lemon-colored, no less than 3 minutes. Do not underbeat. Gradually beat in remaining 1 cup of sugar and continue beating until smooth. At low speed alternately blend flour mixture and orange juice into the egg yolk mixture, starting and ending with the flour. Add orange peel.
Now gently fold yolk mixture into egg whites. I never know if I have adequately folded this together. I did not want to deflate the egg whites but did not want the batter to be unblended.
Prepare the pan. The instructions are to use an ungreased 9 3/4 by 4 inch kugelhopf pan. Or a tube pan without removable bottom. So I use a bundt pan. If desired, one can spray the pan with cooking spray but after baking do not invert over bottle to let cool. Just put it on a rack to cool completely and then remove from pan by running a spatula around the edge of the cake.
Dust with powdered sugar, cut and serve. Success is mine! It is light and airy and has a light orange taste. Hubby says “moist, orangey”, at first he said “lemony” so perhaps the other 3 tablespoons of orange juice is needed. But he likes it, and so do I.
This is the cake my Mom always made. It has become a staple of my household as well. In 2007, when looking through her multitude of recipe clippings I found the newspaper clipping that she kept, had written “Best Ever” on the side of the clipping, and then had typed into her own recipe notebook. I have made a scrapbook page to grace the cover of one of my most organized recipe notebooks. I had printed a copy of this recipe and kept it on the inside door of a kitchen cabinet at one time when I was raising my kids!
I had somewhat decided that I would not make desserts for a while as I have gained a bit of weight over the past three months. Most likely due to Holiday baking but also due to the lack of usual physical movement due to this broken ankle. It is partially healed but will need a bit more time. Aye yi yi! However I needed an excuse to try out the newest Buttercream frosting from Nila at http://thetoughcookie.com/2016/02/08/how-to-make-swiss-buttercream-swiss-meringue-buttercream/.
So Best Ever Chocolate Cake is my “go to” recipe but I did not want a big cake to sit around my kitchen for me to nibble away on all week! I decide to make half the recipe (it divides very nicely) and make 12 cupcakes. I can always send the “leftovers” to work with hubby.
Original ingredients: (full recipe)
1 cup lard or shortening
2 cups sugar
2 beaten eggs
1 cup sour milk
1/2 cup cocoa
2 1/2 cups flour
2 teaspoons baking soda
1/2 teaspoon salt
1 cup boiling water
1 teaspoon vanilla
And Mom’s version:
Mom would have used shortening or oleomargarine. Mom would make cake for Sunday supper. She would bake most of her cakes including this one in a 9 x 13 baking pan. She would sprinkle on powdered sugar. And here’s how to serve cake: cut the cake into two parts. Cut one part into six equal pieces. We kids thought “equal” was very important! Serve the family (2 parents, 4 children) dessert. Save the other half of the cake until the next night’s supper and do the same thing. Mom had a similar approach to those rare occasions when she bought ice cream from the grocery store. This was when the package was a rectangle and a full half gallon! She would open the rectangle flat. She would slice the rectangle of ice cream into six equal (emphasis again on the equal) parts and serve the family. The flattened open box was then put on the floor for the cat to have her treat.
Over the years I have altered the ingredients from time to time. I use butter now and not shortening. I usually keep buttermilk in the fridge so that can be used instead of sour milk. At times, recently, I use coffee instead of the hot water. I once “improved” the recipe using Shirley Corriher’s book Bakewise for the “scientific” version based on ratios and weights of flour, sugar, eggs, and fat. That required more eggs and using half butter and half oil. If I remember correctly that cake was more evenly baked, the top was not puffed up and the color was slightly lighter as was the texture. I think my son liked that cake.
Even though I had intended to only make a dozen cupcakes I thought it would be interesting to make the original (I have lard in my fridge to use!) and then make my more “modern” version. There will be family home for dinner tonight to test these on.
For the first set I use lard (I am not going to use oleo), regular cocoa, and make the sour milk. I even sift the dry ingredients together. For the second batch I use butter, buttermilk, coffee, and Hershey’s Special Dark Cocoa. I whisk the dry ingredients together. Otherwise I use the same method for mixing the batter as per the original clipping. This is how mom taught me. She also had me sift the dry ingredients three times and only stir the batter clockwise. We did not always have an electric mixer available.
There is a definite color difference. The “modern” version rose a little higher as well but not too much so. I will have to remember which are which once I frost them!
Now that I think about it, I could have piped the buttercream on one batch and spread it on the other!
Let us see what the family thinks. They were excited about the experiment. We spent 10-15 minutes in discussion and deliberation after dinner. My son had grown up eating this cake. His first response was that both tasted like he remembered. Hubby liked the darker version because it looked as if it would be richer and more chocolaty. Stepdaughter (I hate the prefix “step” but it is what it is!) liked the look of the lighter brown one and noted that it had a nice “muffin top” which was appealing. Everyone thought that if they were presented on different days and not in comparison with each other, the difference would not be evident.
Results: The lighter brown cupcake was the original recipe. The darker brown was my modernized version. The modernized version was described as moist. The original version was cakey. There was no discernible taste difference. After several cupcakes were tested, and devoured, with and without the frosting, the preference was for the original recipe. When the changes were described the suggestion was to make the original but use butter and buttermilk. This is exactly how I have been making this cake for the past 10 plus years!
I was sitting in my kitchen reading blogs on brownies. Some of you make wonderful sounding brownies and other chocolate goodies! So I began to contemplate brownies. I got out all the chocolate in my baking pantry to see what is there. I have semi-sweet chips, Special Dark Chips, German’s chocolate, unsweetened chocolate, bittersweet chocolate, Hershey’s Natural cocoa, and Hershey’s Special Dark cocoa. These are out on the counter when son walks in and asks what I am making. When I mention I was thinking of brownies, he says he likes chewy, not cakey, and no add-ins such as chocolate chips or nuts. He also likes the shiny crust on top. Me, too.
Recipes abound! I bring out a few recipes and am undecided. He refers me to look at Shirley Corriher’s book Bakewise. After all, he says, he made the cheesecake with a gingersnap crust and it was great. So I start reading the section on brownies. Very interesting. I had just been reading the King Arthur Flour blog on brownies and the shiny crust. http://www.kingarthurflour.com/blog/2015/05/31/make-brownies-shiny-crust/ . There is no real agreement on what makes cakey, shiny crusts, etc. I know that my favorite brownies were very chewy and came from a recipe on the back of Nestle Toll House chocolate chips way back in the 1980s. I have lost that little clipping and have been searching for the best brownie recipe ever since. For about 10 months in 1999 I made a batch of brownies weekly and tested them on my teenagers and their friends. I did not have a standard rating scale but only listed where the recipe came from. After these many trials the best brownies were determined…to be from a mix! It did not even matter which brand. The box brownies were chewy and always had the shiny crust!!
That was then, this is now. I have honed my baking skills and knowledge and much less frequently make brownies from a box. That elusive perfect brownie is still out there. Brownie recipes that I have used make up well and do not go uneaten. I just have not determined a “go-to” standard recipe. Brownies are basically butter, chocolate, eggs, sugar and flour.
We decide to go with the Shirley’s Fudgy Brownies from Bakewise, page 411-412. This recipe calls for 1 ½ cups of butter and four different sugars. It also uses 4 whole eggs and an additional 3 egg yolks. Wow! We run to the grocery to get the light corn syrup as the fourth sugar. There is also powdered sugar, granulated sugar, and brown sugar. For the chocolate the recipe calls for 12 ounces semi-sweet chocolate, finely chopped, and 1 ounce German’s chocolate. There are a lot of ingredients in these brownies! We left out the pecans.
1 ½ cups unsalted butter, cut into 1 tablespoon pieces
12 ounces semisweet chocolate, finely chopped
1 ounce German’s Sweet Chocolate
4 large eggs
3 large egg yolks
1 ½ cups dark brown sugar, packed
1 cup confectioners (powdered) sugar
2 tablespoons granulated sugar
3 tablespoons light corn syrup
1 tablespoon vanilla extract
¾ teaspoon salt
1 ½ cups spooned and leveled bleached all=purpose flour
(In reading this now I realize that I only used ¾ cups of packed brown sugar but also used ¾ cups granulated. The page must have flipped over to the Shirley’s Cakey Brownies recipe! No worries!)
Her instructions are to melt the butter with the chocolate. In a separate bowl beat the eggs to blend the whites and yolks and then add the other ingredients, except for the flour. Add the egg mixture to the chocolate mixture. Then stir in the flour without over beating.
We get all this put together. In beating the egg mixture I beat them in the stand mixer for a few minutes more because this will give the shiny crust. Apparently it is a “meringue” from the egg whites and sugar that rises to the top of the bake.
The oven has been preheated to just 300 degrees F. All ready to go in but son has the idea it should sit in the pan a bit to even itself out. While I wait for that to happen I reread the recipe. OOPS!!! I only used half the amount of butter. I used 1 ½ sticks instead of 1 ½ cups! What to do?
adding the missing butter
I scrape the batter back into the mixing bowl. I melt another 1 ½ sticks of butter and add that to the batter and blend. This is a necessary step because the fat to flour ratio makes the difference between fudgy and cakey.
I then pour this back into a re-prepared 13 x 9 inch baking pan and pop it into the oven. This time I don’t bother with the foil just sprayed the pan. It has taken 45 minutes of prep time at this point. Well, 5 of those minutes were adding in the butter that I had forgotten to add in the first place by my miscalculations!
shiny crackling crust
52 minutes later a toothpick stuck in the middle comes out clean. Take this out of the oven right now so as to avoid overbaking. We want fudgy and chewy. There is definitely a shiny crackling crust! That was a success.
Do you know of anyone, ANYONE, who waits until the brownies completely cool before cutting? I don’t think it is a natural thing to do. I would be concerned if there were a chocolate brownie lover out there who actually follows that step of these recipes. Granted, cool brownies cut more cleanly. But why is that important? Son pokes and prods at the side and takes a nibble. The only thing left to do is to actually cut a square and taste it. Very rich and sweet. It is fudgy and has its shiny crust.
definitely fudgy
These are successful but the recipe is a bit too fussy to become a “go-to” for me. It is a “keeper” though because it is in a book. The book is worth reading as she explains the science of baking and some history of recipes and is just plain interesting.
Some of these will need to be individually wrapped and frozen for later enjoyment.
I slept in a bit in the morning. This allowed little cat to continue to curl up on the covers with me. It is a cold day but not quite as cold and windy as the day before. While sitting at my kitchen table having my morning coffee it occurs to me that this would be a good day to warm up the kitchen by baking something. But what? I do not want to bake something too sweet or something that there is a lot of. Chocolate always comes to mind but that may be too sweet.
While perusing two of my cookbooks that were published in the UK, I come across a sultana and walnut bread recipe with photo. That looks good. It is yeast bread. Do I want to take that much trouble this morning? I have all the necessary ingredients. However, if I want to make raisin bread, this would make a nice toast for breakfast with my coffee; why not use the tried and true Soulard Market cookbook? I get this book out and I have all those necessary ingredients as well, including the chopped pecans. Decisions, decisions!
The perusing of the UK cookbooks was to find recipes for quinoa, bulgur, and barley. I bought packages of each of these interesting grains at my local Aldi store, and wanted to make something other than tabbouleh since I do not have fresh cucumber or cherry tomatoes. I find an interesting chick pea recipe and one for sweet potatoes. I will make the sweet potato recipe with ginger for supper. So the perusal was still productive in that since.
I decide to make the Soulard Raisin Bread. My kitchen is cold and a yeast bread will take twice as long to rise and I am getting a late start to the day as it is. Not that I have anything to do except what I choose to do these days, at least for a few more weeks.
Quick-Stirred Raisin Bread:
2 cups whole wheat flour ( in my experience baking with only whole wheat flour makes a product heavier than I like; I use 1 cup all-purpose and 1 cup whole wheat)
1 teaspoon each of baking powder, baking soda, and salt
1 egg
1 ½ cups buttermilk
¼ cup honey or maple syrup (I use honey; maple syrup is too dear and I want it for my waffles and pancakes when I get around to making some)
1 cup raisins (see brilliant idea later in the narrative)
½ cup chopped pecans
Like quick breads and muffins the dry ingredients are combined and then the wet put in all at once and stirred only until blended. I use a whisk to combine the dry ingredients. This is much handier than using a sifter. I had read a handy hint somewhere that spraying the measuring cup with cooking spray before measuring honey helps to ease all of the honey out of the cup and into your recipe. I did this and it really worked!
After the dry and wet ingredients are mixed it is time to add the “extras”. So I am pouring the golden raisins into the measuring cup when I have a brilliant idea! I have in my pantry a package of dried Berries and Cherries!
These will go in this bread nicely. So I use ½ cup of the raisins and fill the rest of the cup with Berries and Cherries. These get stirred into the batter and put into the prepared pan (greased or sprayed with cooking spray. Now it is ready to go into the oven. Bake for 55-60 minutes.
The recipe directions then say to cool in the pan for 5 minutes before turning out onto a wire rack to finish cooling. Now comes the hard part: waiting for the bread to cool so that it slices nicely.
I spread this piece with cream cheese and enjoy. If hubby and I don’t eat all this evening for a dessert, I will toast a slice or two for breakfast in the morning. Yum!
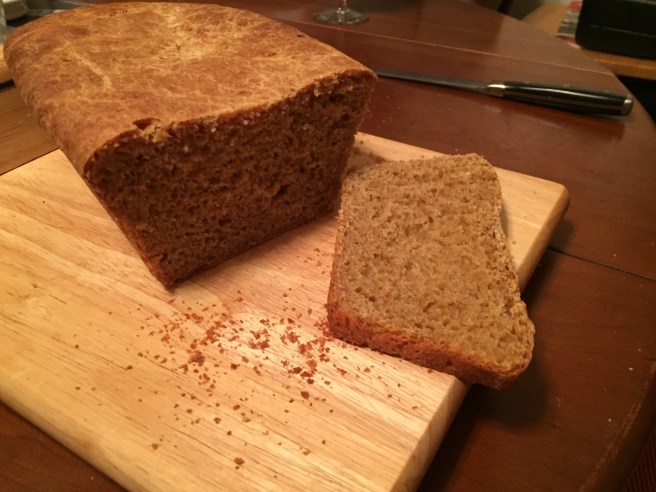
I found this interesting bread recipe while browsing through my Mom’s recipe notebooks. I had a carton of buttermilk in the fridge that needed to be used and I had exactly three cups of whole wheat flour, the white whole wheat variety from King Arthur Flour.
I gather up my ingredients and get to work. Reading through the recipe finds that there are three rising times for this bread and that it makes three loaves.
2 packages active dry yeast (I use instant yeast at 1 3/4 teaspoons per active yeast packet for a total of 3 1/2 teaspoons)
1/2 cup warm water (right from the tap)
2 cups buttermilk
1/2 cup butter (one stick, unsalted)
4 tablespoons sugar or 1/2 cup honey (I use the honey)
1/4 teaspoon baking soda
1/2 to 1 teaspoon salt (I use 1/2 teaspoon)
3 eggs
3 cups whole wheat flour or cracked wheat flour, or combination (I use KAF White Whole Wheat Flour)
all-purpose flour to make a soft workable dough, about 5 cups
melted butter (optional, as I forgot to brush the tops with this as the loaves came out of the oven!)
Dissolve the yeast in the warm water. I do this even though instant yeast does not need to be activated. Pour the buttermilk in a saucepot, add the butter and heat until butter melts. Don’t mind if this curdles, it will not affect the final product.
Meanwhile in large bowl mix the honey, baking soda, salt and eggs. The yeast mixture and the buttermilk mixture are to be added to this and stirred well. I find that this mixture gets quite hot and I need to let it cool down before proceeding.
Slowly add the whole wheat flour. The recipe clipping says to mix with a fork but I always use my Kitchenaid with the bread hook. After the wheatflour is added, add enough all-purpose flour to until you must use your hands to mix it in to make it soft and satiny. Here again I guesstimate this because I add 5 cups of the white flour and it is shiny and sticky. I knead this for 10 minutes with the bread hook and add one or two more handfuls of flour but it is still sticky. Supposedly one is supposed to have been able to turn this out on a floured board and knead it for about ten minutes. I did not want to keep adding flour and have a dry bread.
After this first kneading place in greased bowl, cover with plastic wrap and a towel, let rise for an hour to double in bulk. This rose nicely. Then punch dough down, knead lightly (it is still a bit sticky!) and then let rise again. This second rise time is not specified. I assume it is for another hour and that is what I allow. I had to flour the board quite a bit for the light kneading because the dough was sticky.
After second rising, turn dough onto lightly floured surface and knead lightly. Let rest for ten minutes. Meanwhile grease three loaf pans. I chose two loaf pans and one round pan to make rolls out of the third portion.Divide dough into three equal parts. Roll each part into a rectangle and roll up pinching edges and place in prepared pans. Let rise another 45 minutes.
Heat oven to 350 F and bake loaves for 35-40 minutes. And then there is bread!
The clipping notes “the bread smells fantastic while baking” and “this whole wheat bread melts in your mouth.” We concur!


 I put the dough wrapped in plastic wrap in the fridge for 15-30 minutes so it will be chilled enough to roll out well. I roll out each of the doughs and cut out four of each shape that I want. Now you put the shapes on top of each other. Now I have used quite a bit of flour to roll out and cut the shapes. How are these supposed to stick together? I text my sister to see if she has any advice. But since she doesn’t answer right away I go ahead and put the cookies in to bake.


 These pretty much can be ready for the oven in one hour. Pretty good for a yeast roll.


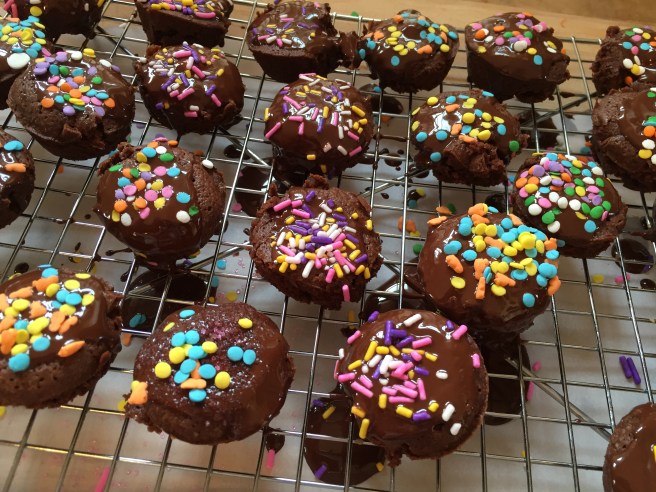


 I put a mini-egg in each brownie bite as soon as it comes out of the oven. I had considered baking the candy inside but was not sure how that would work; so I didn’t. I am now thinking that the Cadbury mini-eggs are not creme eggs so the effect may not be what I am expecting based on the inspiration! I melt about 1/2 cup of bittersweet chocolate chips for the frosting. I added about 1/2 teaspoon oil so it would pour. This may be the downfall of getting the chocolate glaze to “crisp up”. I’ll give it a little time. I sprinkled the brownie bites with a spring sprinkle mix. They look a bit messy but a bit fancy too.
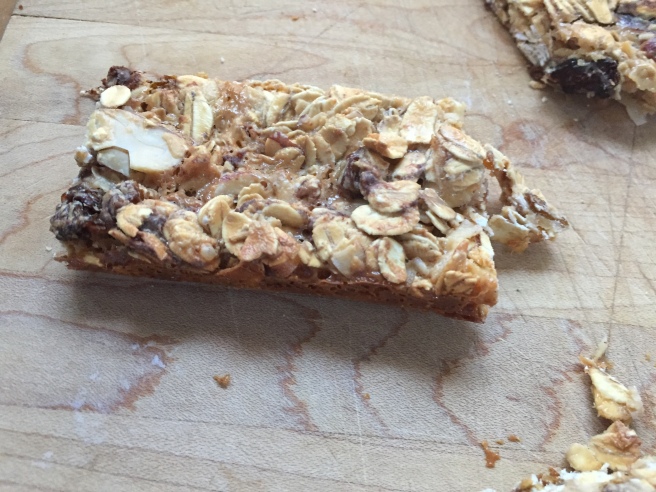
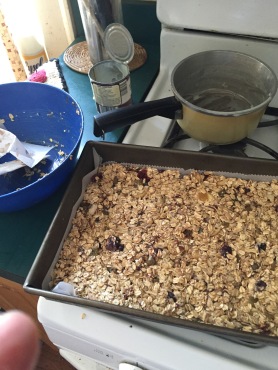 I line a 13 x 9 inch cake pan with parchment paper. Pour the “batter” into this pan. I pat it down evenly with another piece of parchment paper. Bake for 25 minutes. At this point I do not remember if I’m supposed to let cool before cutting or not. I lift it out of the pan and let it cool on a wire rack. When I tried to cut it warm it started falling apart.
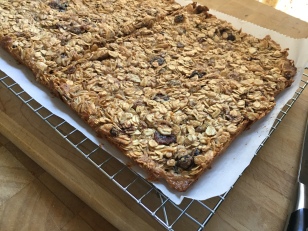


 Original ingredients: (full recipe)


 While perusing two of my cookbooks that were published in the UK, I come across a sultana and walnut bread recipe with photo. That looks good. It is yeast bread. Do I want to take that much trouble this morning? I have all the necessary ingredients. However, if I want to make raisin bread, this would make a nice toast for breakfast with my coffee; why not use the tried and true Soulard Market cookbook? I get this book out and I have all those necessary ingredients as well, including the chopped pecans. Decisions, decisions!
 This is much handier than using a sifter. I had read a handy hint somewhere that spraying the measuring cup with cooking spray before measuring honey helps to ease all of the honey out of the cup and into your recipe. I did this and it really worked!


 Meanwhile in large bowl mix the honey, baking soda, salt and eggs. The yeast mixture and the buttermilk mixture are to be added to this and stirred well. I find that this mixture gets quite hot and I need to let it cool down before proceeding.


