This dish is somewhat inspired by the cover of the April food network magazine. Also by Hubby! When I picked up the magazine at the checkout line I showed him the picture and we both thought that looked good. But Hubby is allergic to shrimp, so it would just be pesto and pasta or trade out the shrimp for chicken.
I did not even bother to read the recipe. Hubby suggests angel hair pasta. We have some leftover grilled chicken and away we go! I want to add roasted red peppers since I have an almost full jar open in the fridge. I have 3 quarter cup chunks of homemade pesto in the freezer. So Hubby starts naming the dish and it’s a “P” tongue twister so eventually we settle on the title. Hubby wants to add the mushrooms but I don’t want to. I have no way of knowing if the type of mushrooms name starts with a “P”!
2 pieces of poultry thighs, already cooked, meat cut off the bone and diced
1 jar of roasted red peppers, sliced and diced, save the juice/oil from the jar
1/4 cup pesto
4 nests of angel hair pasta nests
Pecorino Romano cheese for serving
Chop the peppers and poultry. Put in skillet with a little bit of cooking oil or cooking spray. Stir in the pesto and juice from the pepper jar. Heat through. Cook the pasta according to the package.
When pasta is done divide into two bowls. Top with the pesto-poultry mixture. Sprinkle on the grated cheese. Eat up.
The aroma was wonderful as was the taste. The mushrooms would have fit in perfectly. Hubby thought it needed a bit of sauce. We put a dollop of sour cream in each bowl and that did the trick. Next time making a bit of a butter cream sauce should be made. This would be done by adding a bit of butter to the skillet and a bit of cream/milk/or half-and-half to get the consistency desired.
In my effort to eat healthier, mostly to lose some weight and for heart healthiness, I try new grains. So a while back I picked up a box of buckwheat. I’ve added quinoa to my repertoire of cooking and some barley and bulgur. Oats and cornmeal have always been in my pantry. Rice, too, but now it is always brown rice and not white. Being a novice at using buckwheat I merely follow the recipe on the back of the box. One can cook up a pilaf or cook it up as a hot cereal. I go for the pilaf.
As I am reading the box I read that this is wheat and gluten free. How can it be wheat free if it is called buckwheat? What is this stuff? The internet is a wealth of information for us traditional cooks. Buckwheat is a type of seed called a pseudocereal; another of these pseudocereals is quinoa. These are seeds that are eaten like cereal grains, hence the name. This buckwheat was processed into groats: “100% pure roasted whole grain buckwheat”. Buckwheat is not related to wheat so it is gluten free. Who knew?!
This pilaf recipe instructs that 1/2 cup each chopped onion and sliced mushrooms or other chopped sauteed vegetables can be added to the buckwheat when the liquid is added to the cooking process. Well, I select onion, celery, and other vegetables to add. I like to add more vegetables than a recipe generally calls for because it makes me feel like I’m eating healthier.
2 stalks celery
1/2 medium onion
2 smallish carrots
1/2 green pepper
1/2 red pepper
2 ounces sliced mushrooms
1 cup buckwheat cooked according to package directions: this uses 2 cups broth or water, 1 egg, salt and pepper, and 2 tablespoons butter
about 3 cups of vegetables
The preparing of the buckwheat itself is not a one dish deal! First an egg is slightly beaten in a separate bowl, the buckwheat is added, and stirred about for the groats to get coated. This then is put in a skillet at medium to high heat and stirred constantly for 2-3 minutes so the egg dries on the buckwheat. You will smell this roasting but keep stirring so it doesn’t burn. Meanwhile bring the liquid (I used 1 cup chicken broth and 1 cup water) and the pinch of salt and pepper to a boil. The butter will be used to saute the vegetables which is also on the stove at the same time! I kept changing the pots around so the final cooking would be in the big enough skillet with a lid. Ay yi yi!
Add this all together, stir, cover with a lid,and simmer for 7-10 minutes. This took only 7 minutes for me. I threw in about a tablespoon of red pepper flakes with the water because I thought it might need a bit of spice and red pepper flakes are my secret ingredient for most vegetable dishes.
And I serve this with grilled chicken thighs sprinkled generously with Soulard Grill spice mixture from the Soulard Market Spice shop in St. Louis. (So sis, if you are reading this, we’ll need more of this when we meet up in August. So will son-in-law. Just saying!). And with freshly cut honeydew melon.
The pilaf was good. I am glad that I added the red pepper flakes. Even so, it was not overly spiced. And by adding all those extra vegetables I have leftovers for workday lunches. One cup of uncooked buckwheat will make 4 cups cooked so I think 2-3 cups of vegetables can easily be added. But why coat with the egg? For the breakfast cereal instructions this is omitted. I suppose it is so that the groats stay separate and don’t mush together like a porridge.
This pilaf recipe is a bit fussy in the process of cooking but makes a lot so is worth it. Heating up the leftoers will be quick and easy!
I remember Mom making meatloaf when growing up but this is not her recipe. Over the years, as you know, I collected recipes from various newspapers and magazines. This one is from a 2004 edition of Woman’s Day.
I had saved this I am sure because it was a way to put a meal on the table in a short while. This article promised dinner in 20 minutes. That would appeal to the working parent and it apparently appealed to me.
I had just partitioned a large package of ground turkey into one pound packs. I had all the ingredients with a few substitutions. I don’t have real garlic cloves (I forgot to buy some) and I use the ground turkey instead of the ground beef or meatloaf mixture (beef, pork, and veal). There were three choices: to basic ground beef and 2 eggs, the cook would add a liquid, some mix-ins, and serve or top with a sauce. This article even suggested the sides to round out the meal. I used one pound of ground meat and not the 1 1/4 pounds asked for in the recipe. And I did use ketchup even though I don’t usually cook with ketchup. I had to use garlic powder and my oats weren’t quick-cooking.
So here goes: I gather everything. EVERYTHING. We know that Mise en Place is very important! Well, not as important in meatloaf as in baking, but, it’s the professional thing to do.
1 pound ground turkey
2 eggs
1/2 teaspoon salt
handful of fresh parsley
1/2 medium onion
1/2 cup ketchup
1 tablespoon Worcestershire sauce
1/2 cup oats
1/2 large green bell pepper
1/2 teaspoon dried thyme (this is my own dried thyme from last summer’s herb pot!)
1 teaspoon garlic powder
1/4 cup ketchup with 1 teaspoon Worcestershire plus 1 tablespoon water for the sauce*
Mix the ground meat with two eggs and 1/2 teaspoon salt. Chop the onion, parsley, and green pepper. I’m chopping and chopping and measuring and thinking to myself “this is meatloaf, why am I measuring?”
Mise en place, spices and all!
I mix 1/2 cup ketchup with 1 Tablespoon of Worcestershire sauce and add that to the meat mixture. Then add the mix-ins. Shape into four mini-loaves on a prepared baking pan lined with foil. Oven has been pre-heated to 425 degrees F.
And then because bacon makes everything better, I add bacon!
These get baked for 20 minutes. I then spread the sauce* on the tops of the loaves and leave them in the hot oven for another five minutes. They smell wonderful and are ready just as Hubby comes home from work.
We had just had a huge baked potato the other day so I serve these with mixed vegetables. I am hoping for a meatloaf sandwich for lunch in the next day or two.
This meatloaf “batter” was very “wet”. I think I would use less ketchup as the “liquid”. Or perhaps the extra 1/4 pound meat would take care of that. The taste was mild which was what I was actually going for. That is most likely due to using turkey instead of beef. A barbecue sauce topping baked right on top would be a nice variation and give it a little bit more bite.
One of my favorite meals was meatloaf, mashed potatoes, and cooked carrots. My mother made meatloaf with stale bread crumbs. I remember the ends of bread sitting out on the kitchen counter drying up. No wasting of food for her! She didn’t put any ketchup or sauce on top either. Leftovers were great in a sandwich, bread spread with Miracle Whip. When I started to cook my own meals I read some recipes that used oatmeal in meatloaves instead of bread crumbs. I have used both over the years. I don’t think I have a preference. Do you?
I was reviewing the variety of foodstuffs I have blogged about and did not find any on muffins. I have a whole section in one of my recipe notebooks devoted to muffins. This is because I used to always have a batch of muffins baked and ready to be grabbed for a quick bite to eat as family members started their day. When I was “dieting”, the recipes I would try would be low-fat, chock full of vegetables, made with applesauce, made with whole wheat flour, etc. But now that it is just Hubby and I in the mornings, I haven’t really made muffins on a regular basis. Shall I remedy that situation?
There are two cookbooks that I use for a basic muffin, my Betty Crocker Cookbook and Mark Bittman’s How to Cook Everything. In Betty Crocker the muffin recipe is on page 199. Bittmans’ is almost the exact same recipe but giving suggestions for using melted butter or oil. The amounts of milk differ by 1/4 cup.
On this day I have two very ripe bananas that need to be used. I have never used frozen bananas in baking, just in smoothies. These bananas will need to be used or frozen. I decide to make muffins. I use the Bittman recipe, page 832, using the variation for Banana-Nut Muffins.
3 Tablespoons melted butter or neutral oil (Oh my! As I am writing this it occurs to me that I left this out COMPLETELY!)
1 cup all-purpose flour
1 cup whole wheat flour
scant 1/4 cup cane sugar
1/2 teaspoon salt
3 teaspoons baking powder
1 egg
2 very ripe medium sized bananas, mashed
1/4 cup coconut milk (I did not have regular milk in the house and did not want to open the new carton of half-and-half and did not think that chocolate cashew milk would be appropriate. But now that I think about it, hmmm?)
Mix all dry ingredients in a bowl. I whisk these around with a whisk. Mash bananas in another bowl. Add milk to equal 1 cup. My two bananas were just about a cup as they were. I added a bit of coconut milk at that time and then a little more to the batter because it looked so dry. See note above about the melted butter to know why!
To the dry ingredients I added 1/4 cup dried cranberries, 1/4 cup chopped walnuts, and 1/4 cup chocolate chips. I like stuff in my muffins! I put the egg in the wet ingredients and mixed that up. I then added the wet ingredients to the dry ingredients all at once and stirred until incorporated. This looked dry so I added a splash more of the coconut milk.
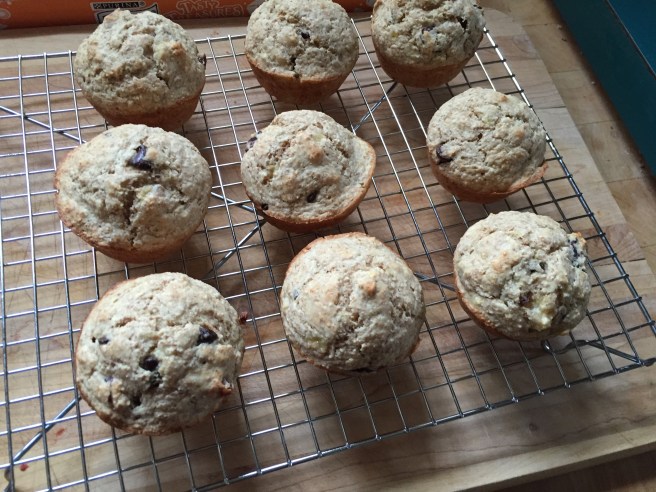
I sprayed the muffin pan with cooking spray. Preheated the oven to 375 F. Portioned the batter into the muffin pan. This made eleven, not twelve. Baked these for 20 minutes. They smelled nice and came out of the pan perfectly.
I serve two for Hubby and me. They are light and fluffy even with whole wheat flour. And they look nice and taste good, too.
Conclusion: I think the banana acted as an adequate substitute/replacement for the fat in the original recipe.
Ever have one of those days that you are tired at the end of a work day, motivation to “create” dinner is just not there, there’s another tragedy in the news, and the weather forecast is early spring turning back into winter? I did not want to sit down and brood over the local tragedy so I made myself fix dinner. We have been using up what groceries are in the house so the fridge is on the empty side. Luckily the last of the meat (chicken thighs) was thawed in the fridge. And there was one lemon and a bit of sad looking parsley. I was trying to keep fresh herbs in cups of water in the fridge but I am not successful at that yet. They just don’t stay looking fresh. What am I doing wrong?
I have made a lemon chicken recipe before: https://mykitchenmythoughts.com/2015/12/03/making-do-a-lesson-in-humility/. But this is slightly different and does not require marinading. I basically just layered chicken thighs, lemon slices, and garlic cloves in a baking pan. Squirted it all over with the lemon juice, sprinkled on some of the chopped sad looking parsley for a bit of color, and baked for 35 minutes at 350 F. I chopped up the last romaine heart, salvaged one carrot from a batch that were trying to sprout, and the remainder of the celery for a side salad. Now the fridge feels good and truly empty! But there is dinner…
The next day was a grocery shopping day. I was trying to think about what we needed only for the week otherwise I over buy. This is one reason I go to the discount grocery stores. More food for less money! But so much food can inhibit my creativity as well. There can be too much to choose from. This is often when I revert back to basic “non creative” cooking and baking such as throwing a roast in a pot, opening cans to make turkey chili, pre-breaded fish fillets, spaghetti and then leftover spaghetti, and sometimes scrambled eggs for dinner.
But now there is food in the house so we will see what this week brings!
These cookies I found in my Mom’s recipe notebook. I do not remember them but my sister does. I wonder if my niece does?
I wanted to make cut out cookies for granddaughter to decorate for Easter. I had been looking at this recipe and thought I would give it a go. It’s a pretty straight forward cookie recipe. The way my mother typed it out assumes the cook knows how to make cookies.So I cream the butter and sugar. Add the eggs and vanilla, then the dry ingredients. Divide the dough about in half and add the cocoa to one half. Now comes the fun part!
I have sent Hubby down to the basement to find the bags of cookie cutters. I rummage around and find the Easter cookie cutters amidst the dinosaurs, the nativity scene (oh yeah, just wait til next Christmas!), regular Christmas shapes, cats. big feet, etc.
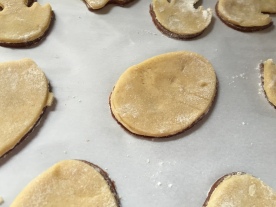
I put the dough wrapped in plastic wrap in the fridge for 15-30 minutes so it will be chilled enough to roll out well. I roll out each of the doughs and cut out four of each shape that I want. Now you put the shapes on top of each other. Now I have used quite a bit of flour to roll out and cut the shapes. How are these supposed to stick together? I text my sister to see if she has any advice. But since she doesn’t answer right away I go ahead and put the cookies in to bake.
My sister finally texted (this is a 21st century word) back saying Mom just stacked them and baked them.”Perhaps a little egg white wash?” But I’m thinking Mom didn’t use egg wash! She may have but I did not know about it.
The cookies just bake up together:
These get packed up and taken to Daughter’s house for the Easter weekend. I pack the three packs of food dye and the container of powdered sugar as well. And let’s not forget the kitchen paint brush. Now comes the fun part!
I know that Easter is past. Life gets very busy so I don’t always have the time to write and post things as often as I had. But I wanted to share this fun roll recipe.
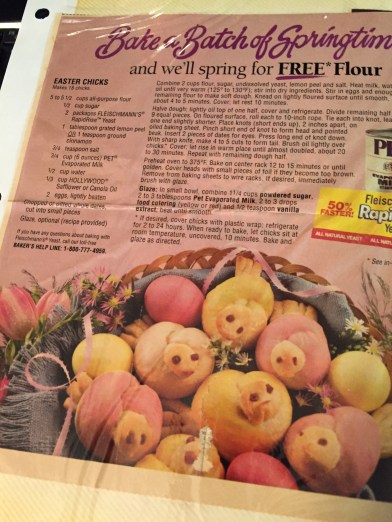
Don’t these look fun? And they don’t take all day to make either. I saved this recipe from a woman’s magazine ad for Fleischmann’s Rapid Rise yeast and PET evaporated milk. I am not sure the year of the magazine that I got this from. I have made these for my stepdaughters maybe 10 years ago but I think I had saved the magazine page before that.
These pretty much can be ready for the oven in one hour. Pretty good for a yeast roll.
5-5 1/2 cups all purpose flour
1/2 cup sugar
1 tablespoon grated lemon peel
3/4 teaspoon salt
3/4 cup evaporated milk
1/2 cup water
1/3 cup vegetable or canola oil
2 eggs,slightly beaten
glaze, optional
The best part about baking these rolls again was baking them with my granddaughter. She has “helped” me bake before so I thought she would want to “help” again. And she did! I even made her her own apron for the occasion.
The recipe: combine 2 cups flour, the sugar, yeast, lemon peel,and salt. Heat milk, water and oil until very warm (125-130 F); stir in dry ingredients. Stir in eggs and enough remaining flour to make soft dough. Knead on lightly floured surface until smooth, about 4-5 minutes. Cover, let rest 10 minutes.
I have not kneaded yeast dough by hand for many years. That’s what my Kitchen-Aid mixer’s bread hook is for! But I am at my daughter’s house and needs must! While I am kneading the dough granddaughter is watching and starts kneading the flour on her small board. Daughter tells me that she is trying to do what I am doing, so I give granddaughter a bit of dough and she follows my lead and does a great job. Look at the concentration on her face.
Now it is easier to work with half the dough at a time to shape the rolls. These make a good size roll and will make 18. Cut each half of dough into 9 equal pieces. I did not get mine very equal but it’s home made, so who cares? Roll each piece into a 10 inch rope. Tie into a knot with one end shorter. This will be the head. Pinch this end into a beak and put tiny pieces of craisins (dates in the original recipe) for eyes. Flatten the other end into the tail and make a few cuts. Place on lightly oiled baking sheet. (If I were at home I would have lined the baking pans with parchment paper.) Brush oil over all (or spray with cooking spray), cover and let rise for 20-30 minutes. Or cover with plastic wrap and put in fridge from 2-24 hours. We placed these in the fridge for overnight so they could be baked fresh for Easter dinner. I took them out of the fridge about an hour before putting them in the oven. Bake at 350 F for 12-15 minutes.
I had packed the recipe card away and did not remember the amount of baking time. I guessed at 20 minutes but just before 15 minutes into the baking they smelled done. And they looked done. The bottoms were a bit browner than I like and I think that was because we oiled the baking pan. I think (but don’t quote me on this) that parchment paper would have been the better choice. Optionally one can make a glaze with powdered sugar, milk or water, and food color to brush over the rolls to make them Easter colorful. I did not choose to do this.
And they were served with our Easter dinner of Prime Rib Roast (cooked by son-in-law), along with cucumber salad and mashed potatoes. Pies, Easter brownie bites, and cookies for dessert.
He is risen. He is risen, indeed! New life for all!
We all have memories of food from our past and there are foods that bring back memories for us. I thought I would take the time to write about some of these.
The picture above is the pot that I used bringing up my kids to make their supper of macaroni and cheese. I would use Kraft Macaroni and Cheese from the box. There were often different shapes of the pasta available. This brought tears to my eyes when I saw that my daughter posted that picture and commented on her Facebook page when she used it to make mac and cheese for granddaughter. My son reminded us that dinosaurs were the premium shape. Dinosaurs were all the rage for my son at a certain age. I even have dinosaur cookie cutters! His favorite dinosaur was the Ankylosaurus. Can you name the dinosaurs below?
“If cows could, they’d give Milnot”. This is the ad for Milnot which is a “nondairy” filled milk product. It was shelf stable and used primarily for cooking and baking. Mom had this as a pantry staple as well. It was probably less expensive than brand name evaporated milk. Milnot would be whipped for “whipped cream” mostly on top of Jell-O for special occasions. Put the mixer beaters and a metal bowl in the freezer in advance. It was also a key ingredient in fudge which would be cooked up in the fudge pot. Now my daughter has the fudge pot AKA the Macaroni and Cheese pot.
I have written some posts on the recipes from my childhood including Best Ever Chocolate Cake, No Bake Chocolate Cookies (in This is Childhood), Missouri Mix, and Candied Orange Peels. And since I have my mom’s recipe notebooks, I probably make a lot of the things she did. I believe my sister has a better handle on what came out of mom’s kitchen since she got to spend more time with her. In high school the grades went on split shifts so I was in school from early in the mornings to noon-ish. Then I babysat in the evenings. My sister had the mornings home with mom and went to school in the afternoon to early evening. Poor mom, she had four kids in four different schools one year!
Growing up, our household used oleomargarine and not butter. When my younger sister was in High School and I had gone away to college, our parents located a farm nearby where they could purchase raw milk. So they bought the milk, skimmed off the cream and Mom made butter. Butter to me had a sour smell and taste. Now, of course, it tastes wonderful, but at first, not so much. I remember bringing frozen homemade butter back with me my junior and senior years at Baylor because I was living in apartments. Later as an adult when I learned that I had high cholesterol there were new products out on the market designed to reduce bad cholesterol, i.e., Smart Balance; spreads made of olive oil, flax seed, and the like. My household prefers real butter but I admit that we did frequently use “butter like substances” as they come in spreadable forms and with the idea that they are heart healthy. They are handy to take on camping trips as well. Another “fun fact” is that cookie dough made solely with butter will crack when sliced frozen. Cookie dough made with Crisco slices neatly right out of the freezer. Mom always had the store brand of “Crisco” to use for baking and frying as well. She fried chicken, beef liver, and steak!
Mom’s potato salad: she used pickle relish instead of pickles
And now for Miracle Whip. This is a salad dressing that is making a comeback in the grocery market. We did not use mayonnaise growing up, it was always and only Miracle Whip. This would be spread on bread for sandwiches, dolloped on our lettuce wedges, and as a key ingredient in egg salad and potato salad. Miracle Whip was less expensive than mayonnaise and this is probably why it was a staple in our house. Mom grew up in the Great Depression and was very conscious of costs.
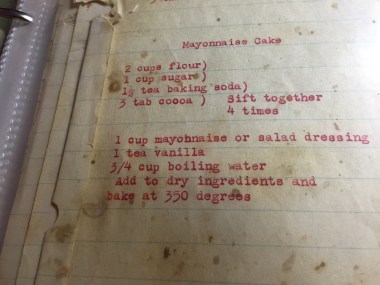
This was also used to make mayonnaise chocolate cake. This cake recipe was developed during the WW2 when eggs and oil were scarce as they went to the war effort. Mom made this cake once in a while. I have made it with Real Mayonnaise as well but it is nothing to write home about, nor was it part of the standard dessert cooking in our home.
I remember Mom trying to get us to eat our Cream of Wheat for breakfast by promising a treat afterwards. The treat I remember was green grapes, but she would not tell us what it was before we finished breakfast. I did not like Cream of Wheat. Come to think of it, I don’t think I got to eat any of those grapes! I was stubborn and wouldn’t eat the hot cereal. Now I love oatmeal; I haven’t really had cream of wheat anytime lately.
Hah! I finally have an excuse to make something chocolate! This is totally inspired by Sofiabakes: http://sofiabakes.com/2016/03/23/brownie-creme-scotch-eggs/
A while back I made brownies but the recipe was seriously too fussy for regular use: https://mykitchenmythoughts.com/2016/02/14/brownies/. But now I want to make some so I can put Cadbury mini-eggs in them. And then smother them with chocolate ganache! I can take these up to daughter’s family for the Easter weekend and not eat them all myself; oh okay, I would share a few with Hubby.
I bake the essential recipe’s Brownies from the Bittman How to Cook Everything Cookbook on page 881. My step-daughter swears by these brownies, well, not really swearsby them, but you know what I mean! It is super simple and makes a chewy brownie.
8 tablespoons unsalted butter
3 ounces unsweetened chocolate, roughly chopped
1 cup sugar
2 eggs
1/2 cup flour
pinch of salt
1/2 teaspoon vanilla extract
Melt the butter and chocolate. Stir until smooth. Stir in the sugar. Beat in the eggs one at a time. Gently stir in the rest of the ingredients. Pour into prepared 8×8 pan and bake at 350 F for 20-25 minutes. Do not overbake.
However I am going to bake them in mini muffin pans so will guess at the baking time. I found that they were done at 20 minutes and even though I coated the pans with cooking spray they wanted to stick to the pan a bit.
I put a mini-egg in each brownie bite as soon as it comes out of the oven. I had considered baking the candy inside but was not sure how that would work; so I didn’t. I am now thinking that the Cadbury mini-eggs are not creme eggs so the effect may not be what I am expecting based on the inspiration! I melt about 1/2 cup of bittersweet chocolate chips for the frosting. I added about 1/2 teaspoon oil so it would pour. This may be the downfall of getting the chocolate glaze to “crisp up”. I’ll give it a little time. I sprinkled the brownie bites with a spring sprinkle mix. They look a bit messy but a bit fancy too.
Let’s see what Hubby thinks of these. Maybe not the fairest test since he doesn’t really have a sweet tooth. I’ll just have to taste them myself!! Ummm, they’re good! Hubby says they are a rich chocolate with a burst of gooey richness. Success!
I do put them in the fridge to harden the glaze. The next day (yes, there are some left!) they are a nice bite of brownie with a piece of candy inside, not creamy. But they are a really rich chocolate; a bit too rich for Hubby. More for me!!
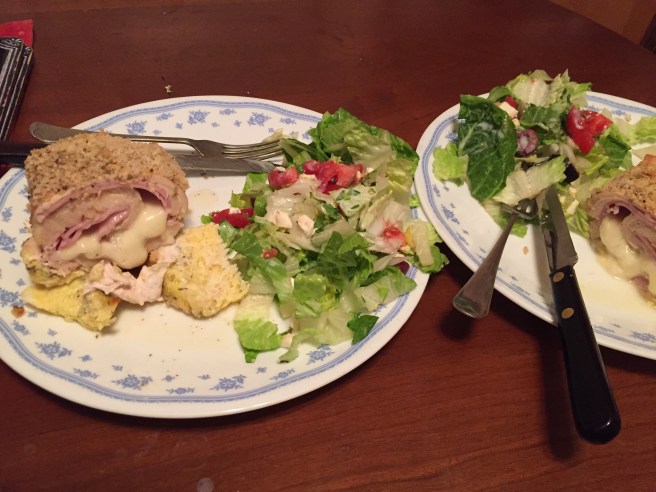
With a name like “cordon bleu” one would think this dish originated in France, perhaps at the famed cooking school. I went looking through my cookbooks to find the recipe to have some history to write this essay. I found that it was absolutely NOT in any of my “French” or “professional” cookbooks!
The only book I have with the recipe is Joy of Cooking. And Joy calls it a classic. So Hubby and I went looking on the internet and found that it is not French, nor very old. It was first seen in print in the NY Times in 1967. The veal recipes date back to the 1940s. The origin is thought to be Swiss. We learn something new every day!
Hubby has always talked about this as one of his specialty dishes. He had made it once before in our time together but not for years. He doesn’t use a recipe, just goes with what is there. His other specialty dish is a stuffed meatloaf. He doesn’t use a recipe for that either.
This past weekend he had the opportunity to make this dish as we had two chicken breasts in the freezer and had gotten them out to thaw. These things are huge! He ends up using only one of the breasts for this dish. He pounds the meat after sandwiching it between two sheets of plastic wrap. And here you can see the flattened chicken breast next to its counterpart.
Hubby then layers this with sliced ham and sliced cheese. The “recipe” for cordon bleu would use Swiss or Gruyere but we have Provolone available and use that. He rolls this up jelly-roll style before placing it in the dish.
We have switched out the square pyrex dish for a smaller casserole pan for the cordon bleu. I cover the extra breast with foil and bake it along side. Hubby then beats an egg and pours that on top. I hand him the bread crumbs, and he chooses the spices he wants. He sprinkles on the crumbs and then the spices. All in between he is washing his hands and the cutting boards to wash away the chicken juice! He puts this in the oven at 350 F and we let this bake for about an hour. I check it with a thermometer to be sure it has reached 160 F internal temperature.
The cheese is melted nicely and the meat is tender. I served this with a green salad and we had a nice meal. And the bonus is that I also have a spare chicken breast already cooked to make chicken salad or pot pie or soup for later in the week.

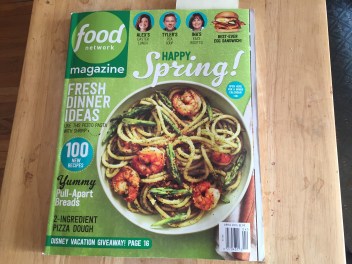 I did not even bother to read the recipe. Hubby suggests angel hair pasta. We have some leftover grilled chicken and away we go! I want to add roasted red peppers since I have an almost full jar open in the fridge. I have 3 quarter cup chunks of homemade pesto in the freezer. So Hubby starts naming the dish and it’s a “P” tongue twister so eventually we settle on the title. Hubby wants to add the mushrooms but I don’t want to. I have no way of knowing if the type of mushrooms name starts with a “P”!


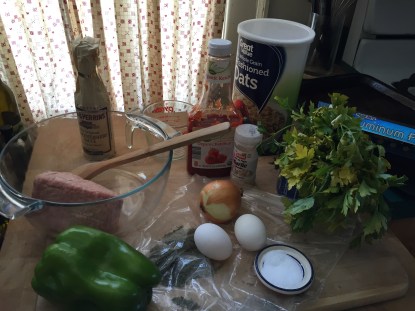 So here goes: I gather everything. EVERYTHING. We know that Mise en Place is very important! Well, not as important in meatloaf as in baking, but, it’s the professional thing to do.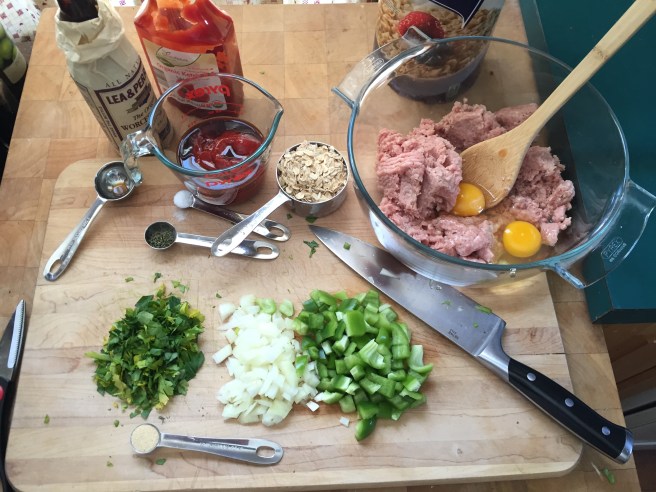



 Ever have one of those days that you are tired at the end of a work day, motivation to “create” dinner is just not there, there’s another tragedy in the news, and the weather forecast is early spring turning back into winter? I did not want to sit down and brood over the local tragedy so I made myself fix dinner. We have been using up what groceries are in the house so the fridge is on the empty side. Luckily the last of the meat (chicken thighs) was thawed in the fridge. And there was one lemon and a bit of sad looking parsley. I was trying to keep fresh herbs in cups of water in the fridge but I am not successful at that yet. They just don’t stay looking fresh. What am I doing wrong?


 I put the dough wrapped in plastic wrap in the fridge for 15-30 minutes so it will be chilled enough to roll out well. I roll out each of the doughs and cut out four of each shape that I want. Now you put the shapes on top of each other. Now I have used quite a bit of flour to roll out and cut the shapes. How are these supposed to stick together? I text my sister to see if she has any advice. But since she doesn’t answer right away I go ahead and put the cookies in to bake.


 These pretty much can be ready for the oven in one hour. Pretty good for a yeast roll.





 “If cows could, they’d give Milnot”. This is the ad for Milnot which is a “nondairy” filled milk product. It was shelf stable and used primarily for cooking and baking. Mom had this as a pantry staple as well. It was probably less expensive than brand name evaporated milk. Milnot would be whipped for “whipped cream” mostly on top of Jell-O for special occasions. Put the mixer beaters and a metal bowl in the freezer in advance. It was also a key ingredient in fudge which would be cooked up in the fudge pot. Now my daughter has the fudge pot AKA the Macaroni and Cheese pot.
 This was also used to make mayonnaise chocolate cake. This cake recipe was developed during the WW2 when eggs and oil were scarce as they went to the war effort. Mom made this cake once in a while. I have made it with Real Mayonnaise as well but it is nothing to write home about, nor was it part of the standard dessert cooking in our home.


 I put a mini-egg in each brownie bite as soon as it comes out of the oven. I had considered baking the candy inside but was not sure how that would work; so I didn’t. I am now thinking that the Cadbury mini-eggs are not creme eggs so the effect may not be what I am expecting based on the inspiration! I melt about 1/2 cup of bittersweet chocolate chips for the frosting. I added about 1/2 teaspoon oil so it would pour. This may be the downfall of getting the chocolate glaze to “crisp up”. I’ll give it a little time. I sprinkled the brownie bites with a spring sprinkle mix. They look a bit messy but a bit fancy too.