Freezer Rolls

IMG_0726

I’ve been making freezer rolls. These were the dinner rolls for our Thanksgiving feast and the cinnamon rolls for Thanksgiving breakfast. Although I had read about these on the King Arthur Flour website here, I dug out my handy-dandy Fleischmann’s Yeast Bread booklet and used a recipe in it. This booklet is falling apart. My mom used this and gave it to me. The copyright is 1971. This recipe makes 4 dozen rolls. So I made 24 cinnamon rolls and 24 dinner rolls.

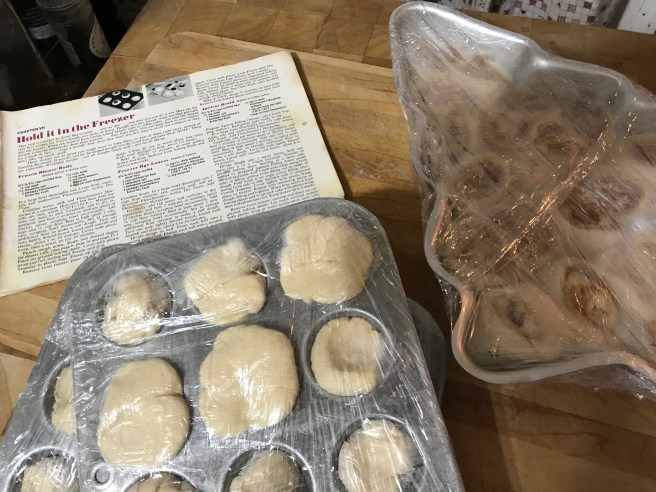
Pick your pans. I use a standard 9-inch x 13-inch baking pan for the cinnamon rolls. Except the picture shows a Christmas tree pan because these are for Christmas breakfast. The mini muffin pans are just to hold the rolls until they are frozen solid and then they can be popped out and put in a freezer bag. These should keep in the freezer for up to one month.

  • 5 1/2 to 6 1/2 cups all-purpose flour (on occasion I substitute 2 cups with whole wheat flour, regular or pastry)
  • 1/2 cup sugar
  • 1 1/2 teaspoons salt
  • 2 packages Active Dry Yeast OR 5 teaspoons Instant Yeast
  • 1 1/4 cups water
  • 1/2 cup milk (any type)
  • 1/3 cup butter
  • 2 eggs at room temperature

Combine water, milk, and butter. Heat to 120-130 degrees F. I most frequently do this is a 2-quart Pyrex measuring cup/bowl in the microwave for 2-3 minutes. Check after two.

In the bowl of your stand mixer combine 2 cups flour, sugar, salt and yeast. Whisk to mix thoroughly.

Gradually add the heated liquids to the flour mixing a you do and then beat on medium speed for 2 minutes. Scrape bowl occasionally. Add eggs and 1/2 cup flour and beat at high speed for 2 minutes. Scrape bowl and add enough flour to make a soft dough. Knead. I knead this with the bread hook for 5 minutes. By hand is 8-10. Turn out on lightly floured board or counter. Cover with plastic and a towel and let dough rest for 20 minutes.

Now shape your rolls. I cut the rested dough in half with a bench scraper and cover one half with the plastic while working with the other. For rolls, I gently pull this half into a log about 12 inches long. Then with the bench scraper I cut this into 24 pieces. I placed these into a greased mini-muffin pan. You could just set them on a baking sheet but wrap them well to freeze. The second half of the dough I roll out into a rectangle, maybe 14 inches by 11 inches? Spread this with 2 tablespoons of melted butter and sprinkle with 1/3 cup of cinnamon sugar. I placed these in the baking pan and then wrapped it with plastic wrap to freeze.

To bake, remove from freezer and place in greased pan. Set on counter and let thaw and rise for 2 hours or so until doubled. Bake at 350 degrees F for 15-20 minutes.

Truth be told, there are differences to the method of the Fleischmann’s booklet and King Arthur Flour. And it might make a difference:

  • KAF suggests using cooler liquids, not warm
  • KAF suggests not to let the dough rest before shaping

Their reasoning is to keep the yeast as dormant as possible so as not to be damaged during the freezing.

The batch of rolls I made for Thanksgiving I used Fleischmann’s recipe (as listed above) but KAF’s methodology. The dinner rolls rose nicely on the counter. The cinnamon rolls rose nicely in the refrigerator overnight. The batch you see in the picture for this blog I used the Fleischmann’s method. Thawing the rolls overnight in the fridge did not see a rise. They were soft and not frozen so additionally I put them on the stove (indirect heat) for 30 minutes before baking. They finally had a slight rise and did bake up nice and soft and tasty.

I think I will stick to the KAF method in the future. It results in a better risen roll. The thaw and rising have more eye appeal. The taste was not affected.


Gateau Basque: another French cake

I’ve been on vacation camping in the Adirondacks, but I am back home. No more camping until next year.:(

Anyway, I was flipping back through the pages of my big French Feasts cookbook to look for the Breton Butter Cake  to make to take on vacation when meeting up with my sister. I wanted her and her husband to taste this creation. I find a recipe that is cake AND a filled cake at that. Is this the real French butter cake? I’ll have to make it and find out. The ingredients are basic cake.

  • 3 eggs
  • 3/4 cup sugar
  • 2 1/2 cups all-purpose flour
  • 3/4 cup butter
  • 2 1/2 teaspoons baking powder
  • 2 1/2 tablespoons light rum
  • 1 egg yolk for brushing on top
  • filling of pastry cream or jam; I used about 1 cup blackberry/blueberry preserves

Whisk the eggs and sugar until pale and thick. I did this with the KitchenAid stand mixer. Whisk the flour with the baking powder.


French Pound Cake: Quatre-Quarts

I love all things French! I have always wanted to speak the language. I took four years of French between High School and College but to no avail. I do recognize some words and phrases and enjoy knowing what Christie’s sleuth, Hercule Poirot, says from time to time on the Masterpiece Mystery movies. But, alas, I never was able to immerse myself into a French-speaking environment in order to learn to speak it myself. I can ask where the bathroom is, though, in a pinch!

On a beautiful weekend afternoon I wanted to bake a cake. Well, I wanted to bake a cake and use this new technique of making fluffy frosting with whipping cream in the food processor. But I did not really want to make chocolate cake. I get out various cookbooks and start browsing. I was all set to make a cake with apples and walnuts or walnuts and maple syrup or a pound cake. Hubby likes pound cake. He had suggested a carrot cake but I did not buy carrots when we grocery shopped the previous day. However, I did not have any walnuts in the house either. I searched. So, pound cake it is.

From my French Feasts coffee table-sized cookbook, there is a pound cake recipe.

  • 1 2/3 cups all-purpose flour
  • 1 cup sugar
  • 3/4 cup butter
  • 4 eggs
  • 2 1/2 teaspoons baking powder

The recipe description says this is a basic recipe that can be personalized by adding apples, pears, banana, fruit conserves, etc. As you can see there is no “flavoring” in the recipe. Also there is probably an assumption that the butter is salted. So I add:

  • 1/2 teaspoon lemon extract
  • zest from one very small lemon
  • I forgot to add a pinch of salt

We like lemon glazed pound cake so that was my plan. Then I wondered about adding some raspberry preserves…lemon and raspberry is a nice flavor combo!

  1. Whisk the eggs with the sugar until the mixture is pale and thick. Add the softened butter, sifted flour, and baking powder. So I rarely sift flour anymore. Instead I whisk the two dry ingredients together for about 30 seconds to thoroughly mix.
  2. I lined a 9×5-inch loaf pan with parchment and cooking spray. I poured about 3/4 of the batter into the pan. I then added about 1/4 cup raspberry preserves to the remaining batter. Then, forgetting how to marble a cake, I plopped the purple batter on top and attempted to make a swirl.
  3. Bake in preheated oven 315 F for 45 minutes. In future I will set the oven for 350. I had to leave it in the oven baking for another 15 minutes. But this may be because I added the jam.

I let the cake sit in the pan for about 15 minutes and then took it out and let it cool on a wire rack. I paced paper towels (parchment paper would have been better) under the rack and while it was still warm I glazed it. To make the glaze I added the juice from the small zested lemon to 2/3 cup confectioner’s sugar. That made too much glaze so I poured about 1/2 of that on the warm cake. Then I let it sit to cool a bit more. And then we ate it.

IMG_0236

I served this with some thawed frozen mixed berries and freshly whipped cream. It was yummy. The swirl is evident but the flavor of the raspberry preserves did not come through. The lemon overpowered it. In future, I would add vanilla to the cake itself and more fruit preserves, maybe just dropping the preserve into the batter in the pan for swirling. The outside had a nice crust but the interior texture was not as dense as expected in pound cake. Not a failure! Actually a success!


I made a Green Grape Pie!

Why, might you ask, and what? I had bought one of those supermarket packages of green grapes and found the the quality was not very good for eating fresh. But what should I do with all those grapes? I could throw them all in the compost bucket but that seems like a waste. I found this recipe on the internet and adapted her adaptation for my own pie: Green Grape Pie

I had two refrigerated ready pie crusts in my refrigerator. Sometimes I buy these instead of making my own. I did not have elderberry flower syrup but the rest of the ingredients were all ready. I gathered them all together and baked a pie.

I think there were about 3 pounds of green grapes. I pulled them off the stems. I did not weigh them. It looked like enough for a pie.
1 cup white sugar, plus extra for top crust
1/2 teaspoon freshly ground nutmeg; I had Hubby grate the nutmeg while he was waiting for his Kindle to charge.
1 lemon, juiced; I had just sliced a bit off of a lemon for my tea, so I juiced the rest of it.
1/4 cup elderberry flower syrup; substituted light corn syrup with real Vanilla!
1/4 cup dark honey; my honey was not particularly dark. Actually I combined the corn syrup with the honey to equal 1/4 cup as 1/2 cup sounded like it would be too sweet.
1/4 teaspoon salt; who measures this? It’s a generous pinch.
3 tablespoons cornstarch
2 tablespoons unsalted butter, cut into small pieces

Preheat oven to 425 F. put one pie crust in the pan and put in freezer while making the filling. This is because you will put boiling hot grapes in the crust and you want the crust not to melt.

Put grapes, sugar, nutmeg, lemon juice, and honey/syrup in a large saucepan and heat. This will eventually need to be brought to boil. Before that boils stir in the cornstarch and salt. Stir frequently until it is boiling and thickens.

With slotted spoon remove grapes and place them in the frozen pie crust. Then add a bit of the syrup to fill the pie. I did not. In fact, there seemed to be enough syrup attached to the grapes already. The recipe has said it was a very juicy pie anyway. Dot the grapes with the butter. Place the top crust and pinch the edges together. I used my pie bird so did not need to cut additional slits. Sprinkle the top generously with sugar. Bake for 30 minutes until crust is golden brown.


Looking good! It is supposed to cool completely before serving. This should let the juices set up a bit.

And then we ate a slice. I’m sorry to say that it is “nothing to write home about”. Hubby declared the crust wonderful but the pie “bland”. It was an interesting texture, mushy-like. The flavor probably did need that elderberry flower syrup.

I took the remaining pie to work to see what my coworkers thought. It was declared “interesting” but was not a hit. It was just not appealing. I will not be making this again. Next time I have a bunch of green grapes that are not the best, I will cook them down into a sauce for chicken or pork. I have to admit the sauce idea was Hubby’s first suggestion.

Blueberry Breakfast Cake

This looked very interesting on the King Arthur Flour Facebook feed so I set out to make it. Believe it or not, I followed the recipe exactly except I used a non-round pan to bake it.

IMG_0094

This is the link to the recipe: Blueberry Breakfast Cake. This recipe uses sour cream and cottage cheese with 3 eggs and some sugar and flour. There is a custard like layer on the bottom with the fruit on top. The cinnamon-sugar topping gives it a nice crunch.

  • 3 large eggs
  • heaping 1/2 cup sugar
  • 6 tablespoons melted butter
  • 1 cup small-curd cottage cheese
  • 1 cup sour cream
  • 1 teaspoon vanilla extract
  • 3/4 cup all-purpose flour
  • 1/2 teaspoon salt
  • 1 1/4 teaspoons baking powder
  • 1 1/2 cups blueberries, fresh
  • cinnamon-sugar, for topping

Heat oven to 350 F. Spray a 9 inch pan with cooking spray. The pan needs to have 2 inch sides. My pan is about 10 x 7 inches. Beat the eggs with the sugar then add the butter, cottage cheese, sour cream, and vanilla. Mix in the dry ingredients. Pour into the prepared pan and sprinkle the berries evenly on top. Bake for 50 minutes. A toothpick inserted into the center should come out clean. Sprinkle the cake with a generous amount of cinnamon-sugar. Let cool for 30 minutes before serving. IMG_0095

Two years blogging!

This was a perfect day for baking.  The weather was downright chilly after a week of sweltering heat. I had printed this recipe earlier in the month and this was the day to use it. So for the anniversary blog I have made the July Bake Along Recipe from King Arthur Flour: Blueberry Hand Pies. Now I have made hand pies before: Pork Pies. But this is summer and the berries are in season and blueberry pie is so good! I had anticipated changing the recipe when I got down to making these, but I followed it exactly! That’s probably a first. I had recently bought some tart pans and thought I would make these into individual tarts and I was even thinking of making my own standard pie dough or using store bought: oh my!

I gathered the ingredients for the pastry and got out my food processor with its brand new blade that I waited 6 months for Cuisinart to replace for safety reasons. This is the part of the recipe that I did not follow. The food processor makes making pie dough simple. I never liked making it by hand.

PASTRY

  • 2 cups unbleached All-Purpose Flour; I had exactly two cups; I thought I might have had to use some whole wheat pastry flour, but I had just enough.
  • 3/4 teaspoon salt
  • 1/2 teaspoon baking powder
  • 1 cup (16 tablespoons) cold unsalted butter
  • 1/2 cup cold sour cream

I pulsed the dry ingredients and then added the butter and finally the sour cream. It does come together in clumps as described in the recipe. When I dumped that onto my lightly floured board and read the description of rolling this out, it dawned on me that this is a puff pastry. Most likely a rough-puff as it only has two turns: rolling out, folding over, rolling out again, repeat, fold over, and chill for 30 minutes. My cutting board block is marked in two inch squares so I measured it to the 8×10 inches both times.

FILLING

  • 2 cups fresh blueberries
  • 2 tablespoons cornstarch
  • 1/3 cup sugar
  • 1/8 teaspoon salt (a large pinch)
  • 1 tablespoon lemon juice

Rinse berries and put in saucepan. Mix the dry ingredients and pour over. Add the lemon juice and cook, stirring occasionally, for about 5 minutes. My filling began to thicken in about 3 minutes over medium-hot heat so that is how long I cooked it. I don’t usually cook the blueberries before putting in pie. But this does help hold the filling together for the small squares of pastry. Let cool. I let the filling cool but not quite to room temperature. And I have leftover filling. This could be good on pancakes or to top ice cream. I will use it to top Brie cheese!

Preheat oven to 425 F and get that pastry out of the fridge and get ready to roll!

Here again I found the markings on my cutting board block helpful. Roll the pastry into a 14 inch square. Then cut it into sixteen 3 1/2 inch squares. My squares were not squared completely nor were they cut to the exact size. Put a heaping tablespoon or two on eight of the squares. Brush the edges with beaten egg. Oh yeah, make a vent in the other eight squares. Then put together and press the edges with the tines of a fork. Brush the rest of the egg yolk on the tops and sprinkle with sugar. And they are ready for the oven.

20170724_213849481_iOS
Looking good so far…

Bake for 18-20 minutes until lightly browned. When I took these out I was in awe…

20170724_215844358_iOS

And they taste great. I am not sure how to share this with the King Arthur website for the bake-along so I will be content sharing it with you who read this.

Many blessings to all!

Your Standard Sour Cream Coffee Cake

Greetings! I am always so happy and surprised that you read what I write. I was going to be a poet when I was a teen, but I guess it was not my calling. I do love to write, so I am happy to have readers. Thank you! 🙂

So it was a gloomy summer day. And in my effort to suck all the joy out of life…oops! I mean in my renewed effort to breathe in all the joy that life has to offer…I thought I should make myself write a blog post weekly.

(Now that I have said “weekly” don’t hold me to it because…life happens, along with moods, and I don’t always like to make commitments!)

20170530_220846485_iOS
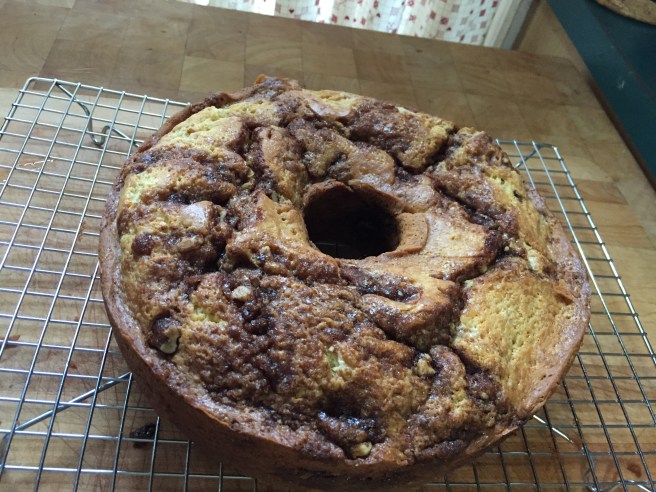
A week or so ago I made a coffee cake for work. I did not have sour cream (or did not look for it in my fridge) so I browsed through cookbooks to come up with something. I made a blueberry buckle with blueberries and cranberries without the buckle. It had the fruit but it also had the streusel topping. I baked it in a tube pan so it really did not buckle. I think “buckle” is the way the fruit indents the top of the cake. The people at work loved it and here is a picture. This is basically 1/2 cup butter, 1 cup sugar, 2 cups flour, 2 tsp. baking powder, 1/4 tsp. salt, 1/2 cup milk, and one egg and 1 cup fruit.

So on this gloomy summer’s eve, I figure it is a good baking day. I will make a sour cream coffee cake because I recently spied sour cream in my fridge. Where’s the recipe? I go to my Settlement Cookbook because it is full of standard baking fare from kitchens of generations of women gone by.

  • 1/2 cup butter
  • 3/4 cup sugar
  • 1 tsp. vanilla
  • 3 eggs
  • 2 cups flour
  • 1 tsp. baking powder
  • 1 tsp. baking soda
  • 1 cup sour cream

preheat oven to 350 degrees F. Spray or grease a 10 inch tube pan. Cream butter and sugar. Add vanilla. Add eggs one at at time. Sift dry ingredients together and add to butter mixture alternately with the sour cream.

Topping: mix 6 Tab. of softened butter (I accidentally melted mine) with 1 cup packed brown sugar, 2 tsp. cinnamon, and 1 cup chopped nuts.

Put half the batter in the pan. Sprinkle (or glob) on 1/2 the topping, layer the other half of the batter and the rest of the topping. Bake for 50-60 minutes. Let cool in pan 10 minutes before removing.

So the cake is in the oven, Hubby is at the dentist, and I am putting the dog out in the yard, going out to un-loop him from the various patio furniture and bushes at least three times, and thinking that this is a standard sour cream coffee cake that is probably found in all those cookbook collections that various churches and other organizations put together as fundraisers. So I peruse a few of those.

The first one I look through has Sour Cream Coffee Cake and the streusel is just sugar, cinnamon, and nuts. Cool! Because I knew that the streusel topping for my first coffee cake has flour in it and I thought that was pretty standard. So I continue reading this recipe and get to the end and see who submitted it. My sister! Gave me a little joy to see her name at the bottom of the recipe!

20170605_215255736_iOS
Sour Cream Coffee Cake

Another Loaf: Apricot

I have not written nor baked in a while. We have been eating ordinary meals. You know, baked frozen fish, grilled chicken or burgers, frozen vegetables, scrambled eggs with onion and peppers, and open-faced grilled cheese with tomatoes. Peanut butter and jelly sandwiches in a pinch! Sometimes I just do not feel like cooking, so when Hubby comes home he throws something together. The open-face grilled cheese with tomatoes are one of his specialties.

At my last camping weekend I brought along the Settlement Cookbook to look through. There are some bread recipes that looked good. Simple and straightforward breads, quick and raised. My mother had given me a paperback Settlement Cookbook when I got my first apartment. I knew how to bake but not how to cook. This book was my guide to cooking meat and vegetables. I remember making biscuit dough cinnamon rolls from this book. Unfortunately like most well-used cookbooks it fell apart and eventually I could not justify saving the torn thing. 😦

At a tag sale (yard sale, garage sale, depending on what region of the country you hail from) there was this newly revised Settlement Cookbook. So I bought it for sentimental reasons. This edition was published in 1965, 1976.

I was originally looking at the banana bread since I had extra ripe bananas in the house. But I froze those so the pressure was lessened. I had some dried apricots so the apricot bread was my choice for the afternoon. I figure I have to bake while the weather allows.

Alterations to the recipe as pictured above are as follows:

  • why would one grind the dried apricots? I roughly chopped them.
  • I used 1 cup whole wheat pastry flour and 1 cup all-purpose flour; to be healthy.
  • I did not have to strain the orange juice because the juice I like does not have pulp.

The batter smelled quite orange-y. The loaf came out very nicely colored and crunchy on the outside. The inside is quite nice with the squares of apricots and nuts throughout. For the future I might add a teaspoon of ginger and/or cinnamon for added kick!

I suppose spreading it with apricot preserves might be a bit too much!

Chocolate Chip Walnut Loaf with Craisins, and some thoughts

Here are some thoughts…

  • Sometimes I think that there are no more unique recipes or ways to prepare ordinary food. And then I read food blogs…
  • I have too many cookbooks so I get stymied in my search for cooking and baking. Too many choices.
  • I was standing over the compost bucket disassembling a k-cup having images of my mother putting all the food scraps in a coffee tin to throw into the garden. She did not have the luxury of a compost service like I have. But there I was “channeling Mom”.
  • How does one simplify the kitchen supplies without giving away something I will need later?
  • Sometimes I don’t feel like cooking even though I am home from work a full hour or more before Hubby. I would like to take a weeknight or weekend afternoon to cook for the week. But I am concerned that I would then not want to eat what has been prepared! And camping season is arriving so my weekends should be spent camping.
  • I need to get three years of pictures off my phone and computer. And organize them in some way. I can’t always remember how to get to the “cloud”.
  • I want to get back to writing my memoirs and organizing them so that my kids can have my thoughts for posterity someday in the future, a long way into the future, when I am gone.
  • Writing is a creative outlet that I need to discipline myself to fit into my daily or weekly schedule. And regular exercise, and meditation, and prayer, and reading, and sewing, and all sorts of things I want in my life…!
  • I also am thrilled that there are those of you out there who read what I write!

Now for cake. This is a recipe that I found in one of my UK published cook books. I made it once before and it broke apart coming out of the pan. The recipe instructed to grease the loaf pan and sprinkle with sugar. Just so you know this does not work well with a stoneware loaf pan. This time I greased the pan, floured it, and put a rectangle of parchment paper in just to be on the safe side. I am pleased to say that the loaf came out of the pan in one piece. Yay!

20170422_133725665_iOS

The recipe:

  • 1 cup all-purpose flour
  • 1 teaspoon baking powder
  • 4 Tablespoons cornstarch
  • 1/2 cup butter
  • 1/2 cup sugar
  • 2 eggs
  • 1 teaspoon vanilla extract
  • grated rind of one lemon (I used a 1/2 teaspoon of lemon extract because I did not have a lemon on hand. I did use the zest in the first loaf I made.0
  • 2 Tablespoons currents or raisins (I used Craisins.)
  • 1/4 cup chopped walnuts
  • 3 Tablespoons chocolate chips

Sift the dry ingredients together. Cream the butter and sugar. Add eggs one at a time beating after each one. To this I added the vanilla and lemon extracts. Add the dry ingredients in three batches. Do not over mix. Then fold in the goodies. I used a combination of the three to an equal of one cup, so a little more than what is listed.

Spread in prepared loaf pan, 9 x 5 inch. Bake in a preheated 350 degree oven for 45 minutes. Let cool 5 minutes before turning out of the pan onto a wire rack.

I never let something like this cool before cutting and eating. It is quite tasty and not too sweet.

20170422_134211832_iOS

Lemon Tea Bread

20170410_232128997_iOS

I came home from work one day this past week and wanted to make something in a loaf pan. I took a handful of cookbooks outdoors and sat at the patio table looking through them to find something to make. I know that a traditional pound cake is a loaf cake but I wanted something else. This recipe is from my KitchenAid cookbook published in 1992. It is the larger cookbook, spiral bound, and not the one that comes with the mixer. I have that one as well but my sister said this larger one does not have all of the recipes from the smaller one, so I kept them both.

I have two lemons that need to be used. I have buttermilk but this recipe did not call for that. After deciding on this recipe I find a similar recipe using buttermilk on the back of the walnut package. Oh well, maybe next time.

I actually did a mise en place. Even chopping the walnuts and zesting the lemon before starting to make the batter. Highly unusual for me with baking in that I always assume that I have everything I need.

This is a tasty and moist bread. It is very nice to have with morning coffee. It would be nice with afternoon tea.

  • 1/2 cup butter, softened
  • 1 cup sugar
  • 2 eggs
  • 2 cups all-purpose flour
  • 1 1/2 teaspoons baking powder
  • 1/4 teaspoon salt
  • 1/3 cup milk; I used vanilla almond milk.
  • 1/2 cup chopped walnuts
  • 2 tablespoons grated lemon peel; I zested one medium sized lemon and juiced it for the lemon glaze (see below).

Put butter, sugar, and eggs in the mixer bowl and beat for one minute at speed 6. I was amazed at how this higher speed creamed everything together so much nicer that using the lower speeds. Combine dry ingredients and add alternating with the milk, ending with the flour. Stir in the zest and the nuts.

Pour batter into greased loaf pan and bake at 325 F for 55-65 minutes. Brush with Lemon Glaze and cool in pan for 15 minutes; remove and cool on wire rack.

Lemon Glaze: 1/4 cup fresh lemon juice and 3 tablespoons sugar. The recipe says to bring to a boil over medium heat and stir until slightly thickened. Well, I put the juice and sugar in a small microwave safe bowl and nuked it for about 90 seconds in 30 second intervals. I poured this over the warm bread.

I had just read that breads and cakes made with citrus zest supposedly taste better the next day after the flavors permeate. I sent a piece to work with Hubby the next day and he reported that this is so.